
inventory_pro.zip)modules/inventory_pro/
├── inventory_pro.php # Main module file
├── install.php # Database migrations
├── controllers/
│ └── Inventory_pro.php # Admin controller
├── models/
│ ├── Inventory_pro_model.php
│ ├── Warehouse_model.php
│ ├── Document_model.php
│ └── Stock_model.php
├── views/
├── helpers/
├── libraries/
├── assets/
└── language/ # 24 languagesAfter installing and activating the module, you need to activate your license to unlock all features.
yourdomain.com)| Status | Meaning |
|---|---|
| Active | License valid, all features available |
| Warning | Grace period active – renew soon |
| Expiring Soon | License expires within 30 days |
| Blocked | Grace period expired – module restricted until renewed |
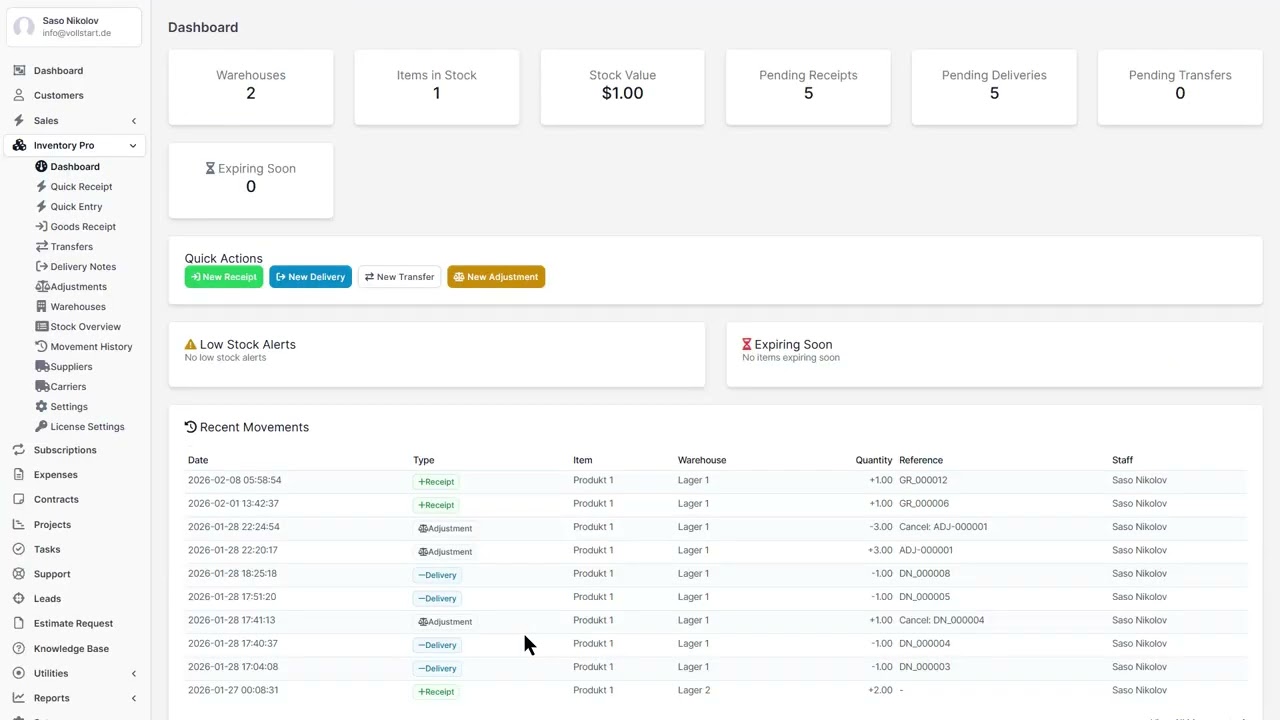
The Dashboard is your central overview when opening the Inventory module. It shows real-time statistics and alerts at a glance.
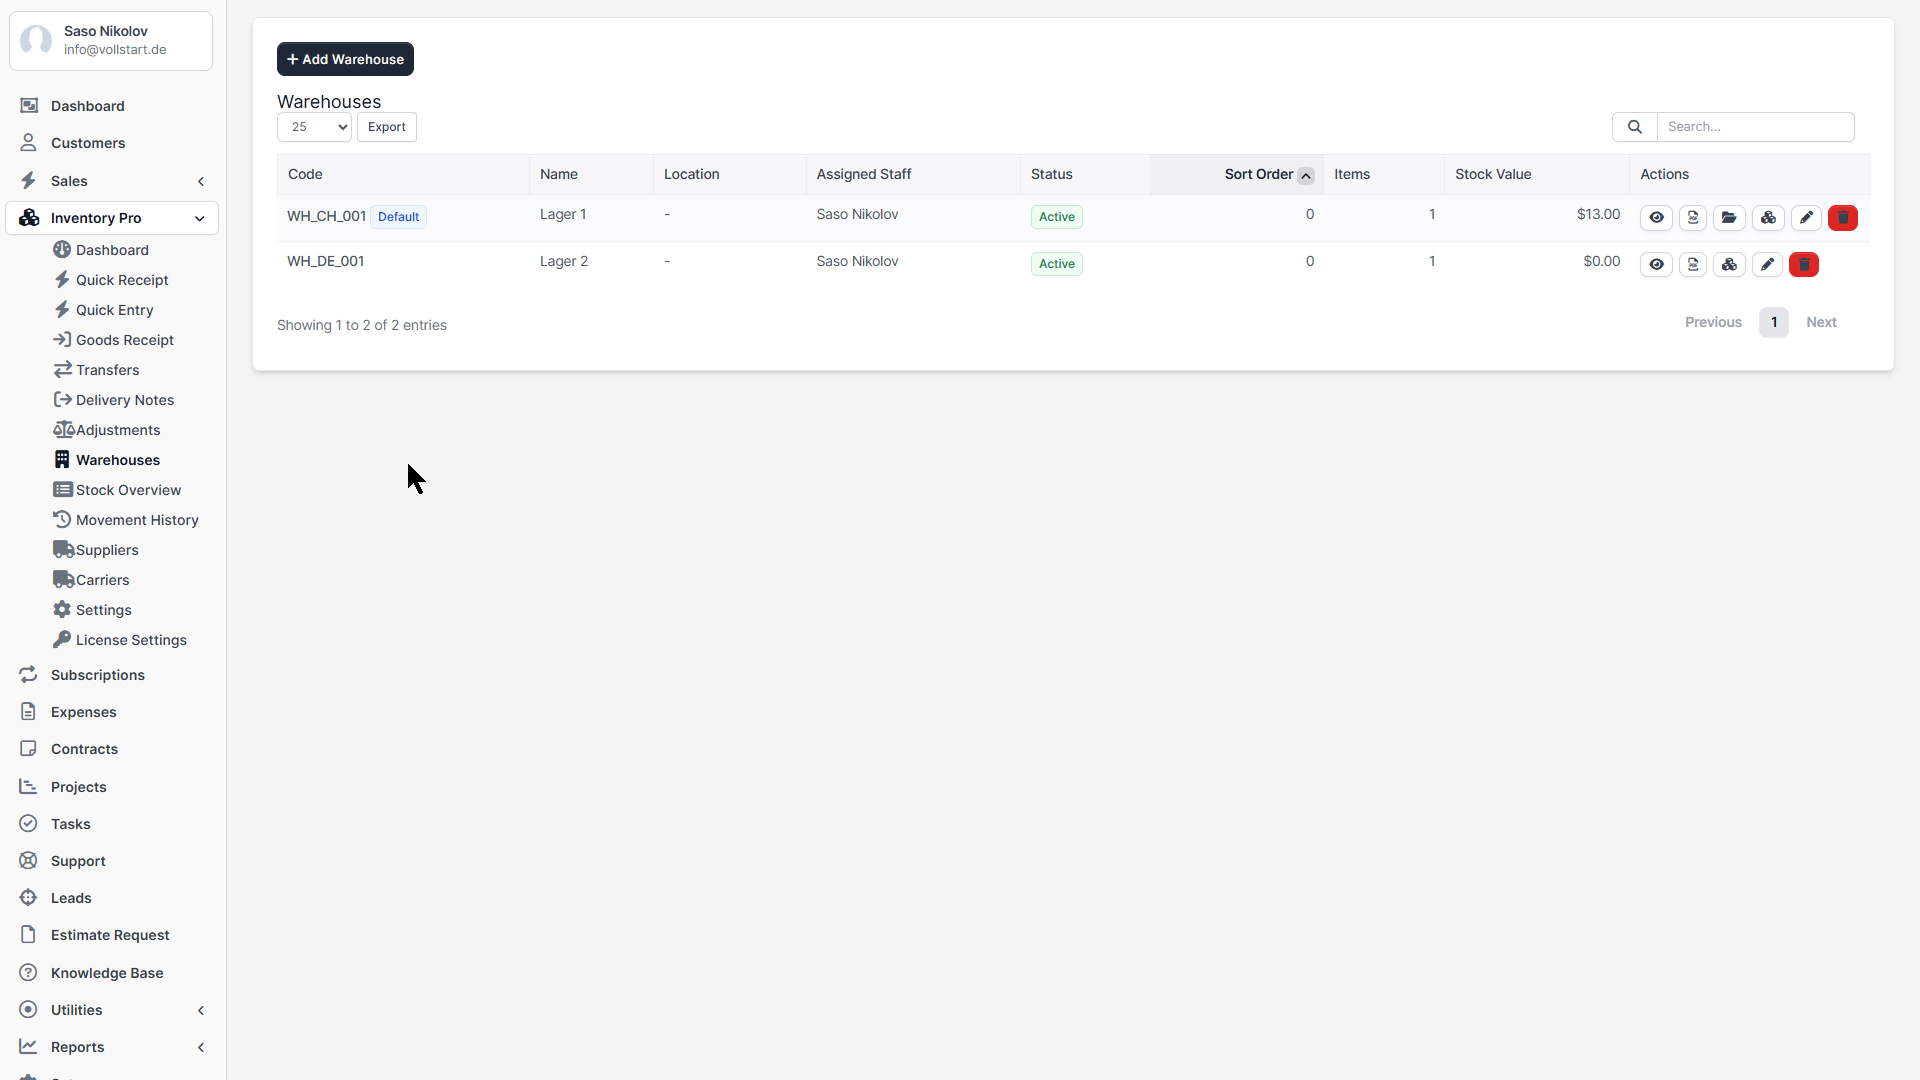
min_stock threshold, with current quantity and warehouse| Setting | Description |
|---|---|
| Code Prefix | Prefix for auto-generated warehouse codes (e.g., “WH-“) |
| Default Warehouse | Pre-selected warehouse when creating documents |
| Allow Negative Stock | Allow stock to go below zero (not recommended) |
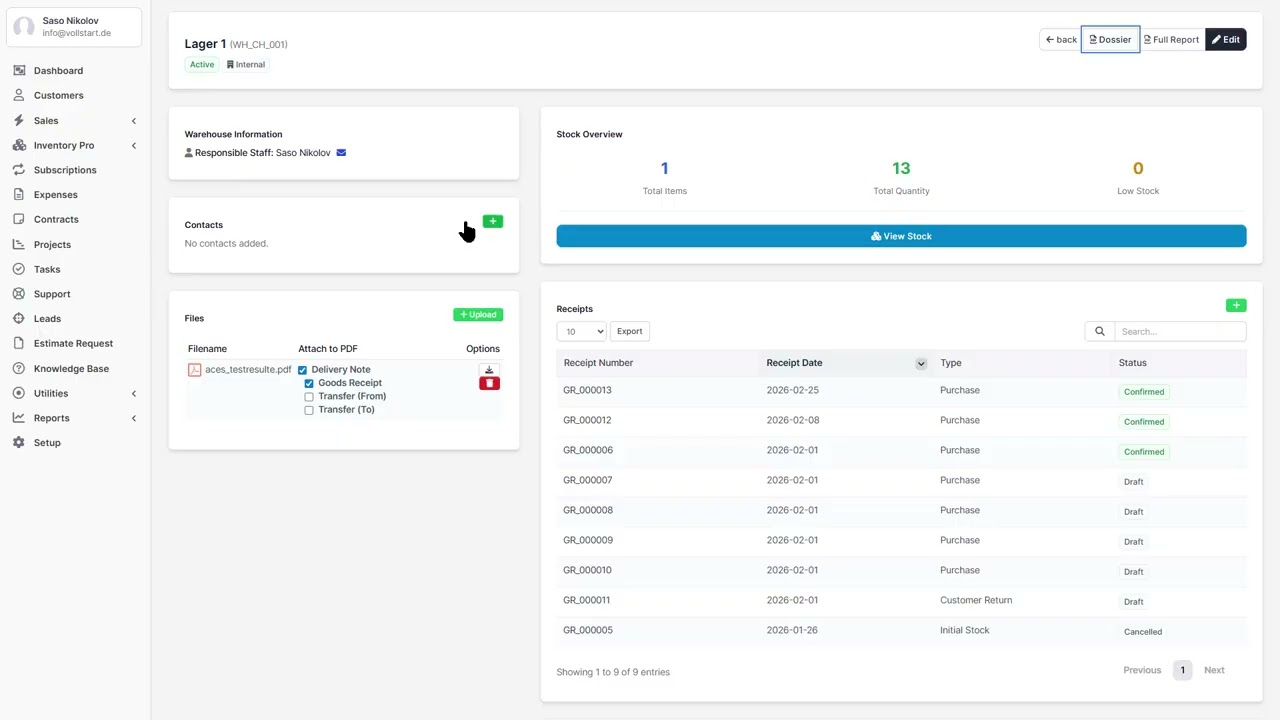
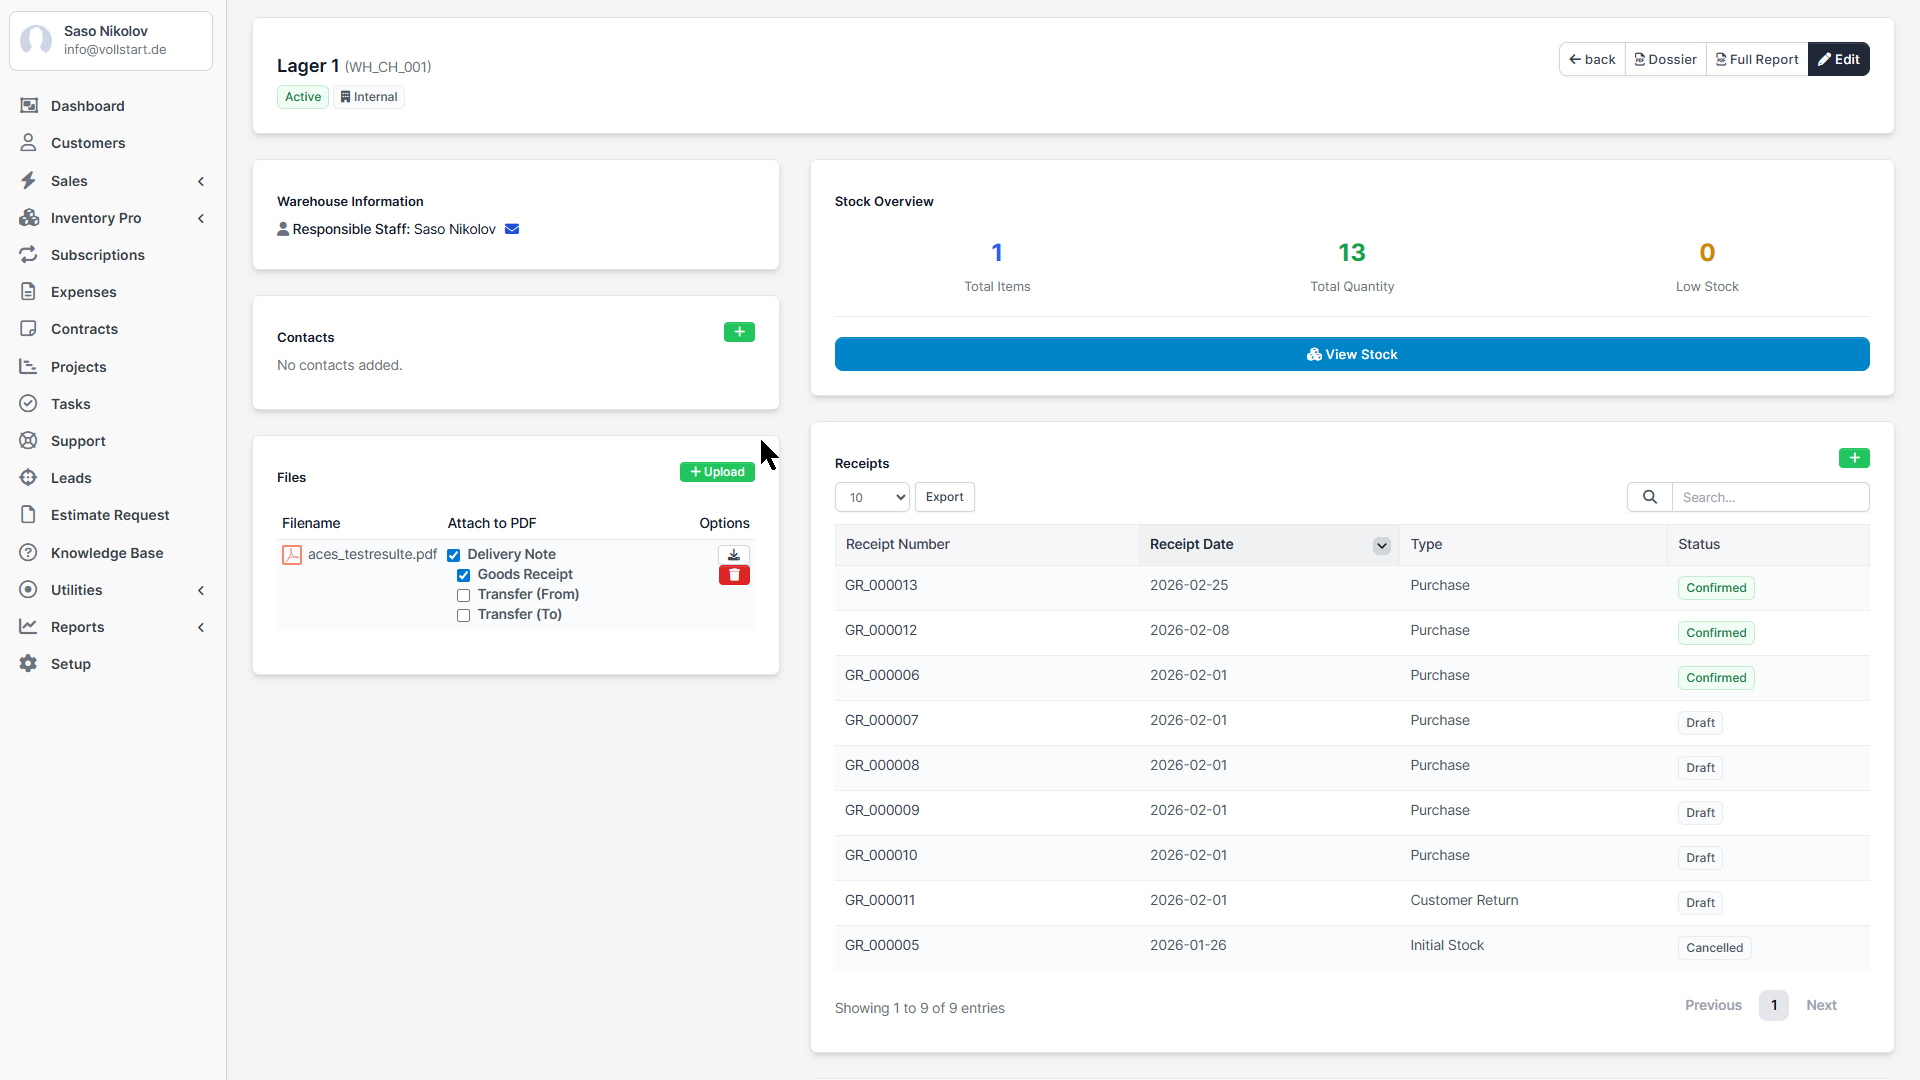
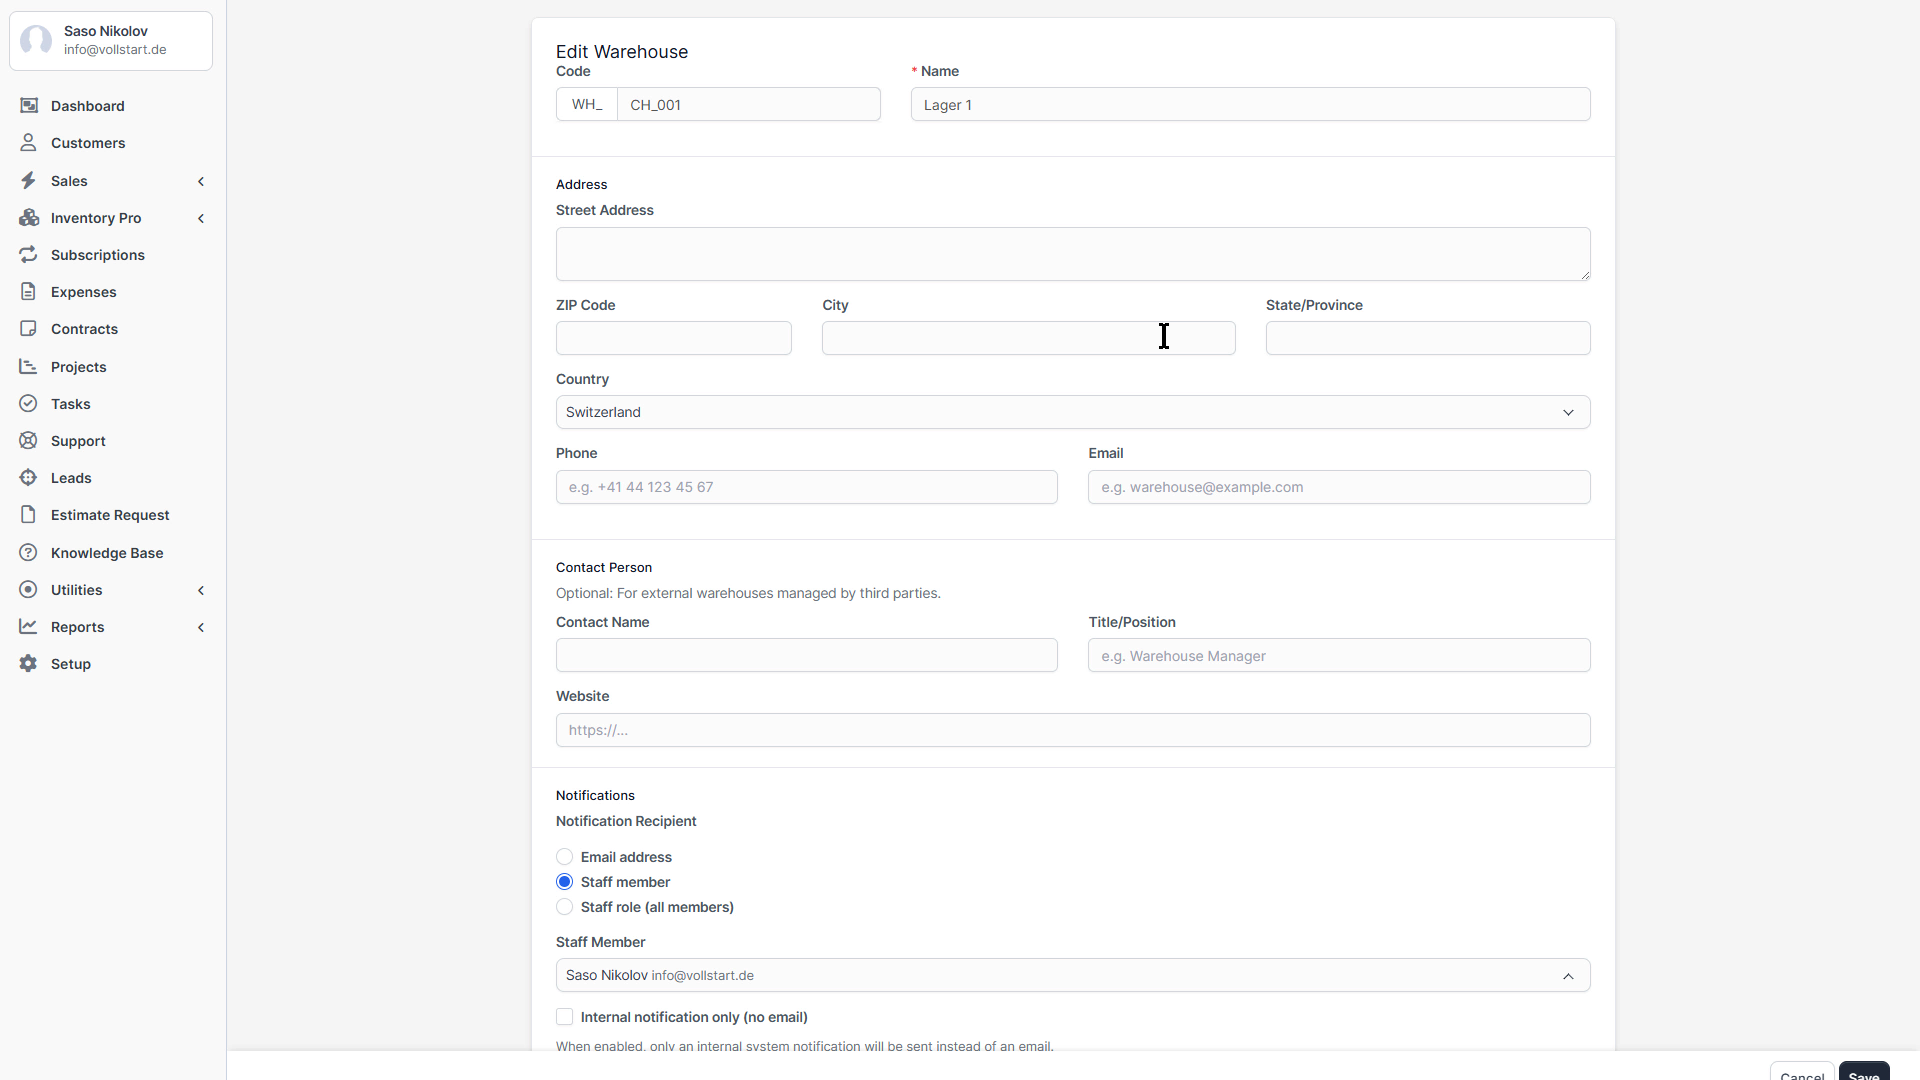
Beyond the basics, each warehouse offers detailed configuration options for contacts, notifications, and file attachments.
| Type | Description |
|---|---|
| Internal | Company-owned warehouse – full control over stock and operations |
| External | Third-party warehouse (3PL, consignment) – managed externally |
Each warehouse supports multiple contacts with different roles:
Add contacts via the Contacts tab on the warehouse detail page.
Get notified automatically when stock arrives or ships from a warehouse.
| Setting | Options | Description |
|---|---|---|
| Notify on Receipt | On / Off | Send email when a Goods Receipt is confirmed |
| Notify on Delivery | On / Off | Send email when a Delivery Note is confirmed |
| Notify Type | Email / Staff / Role | Who receives the notification |
| Notify Staff | Staff dropdown | Specific staff member (if type = Staff) |
| Notify Role | Role dropdown | All staff with this role (if type = Role) |
| Internal Only | On / Off | Send as internal notification only (no email) |
Attach documents to warehouses for reference:
Upload via the Files tab on the warehouse detail page.
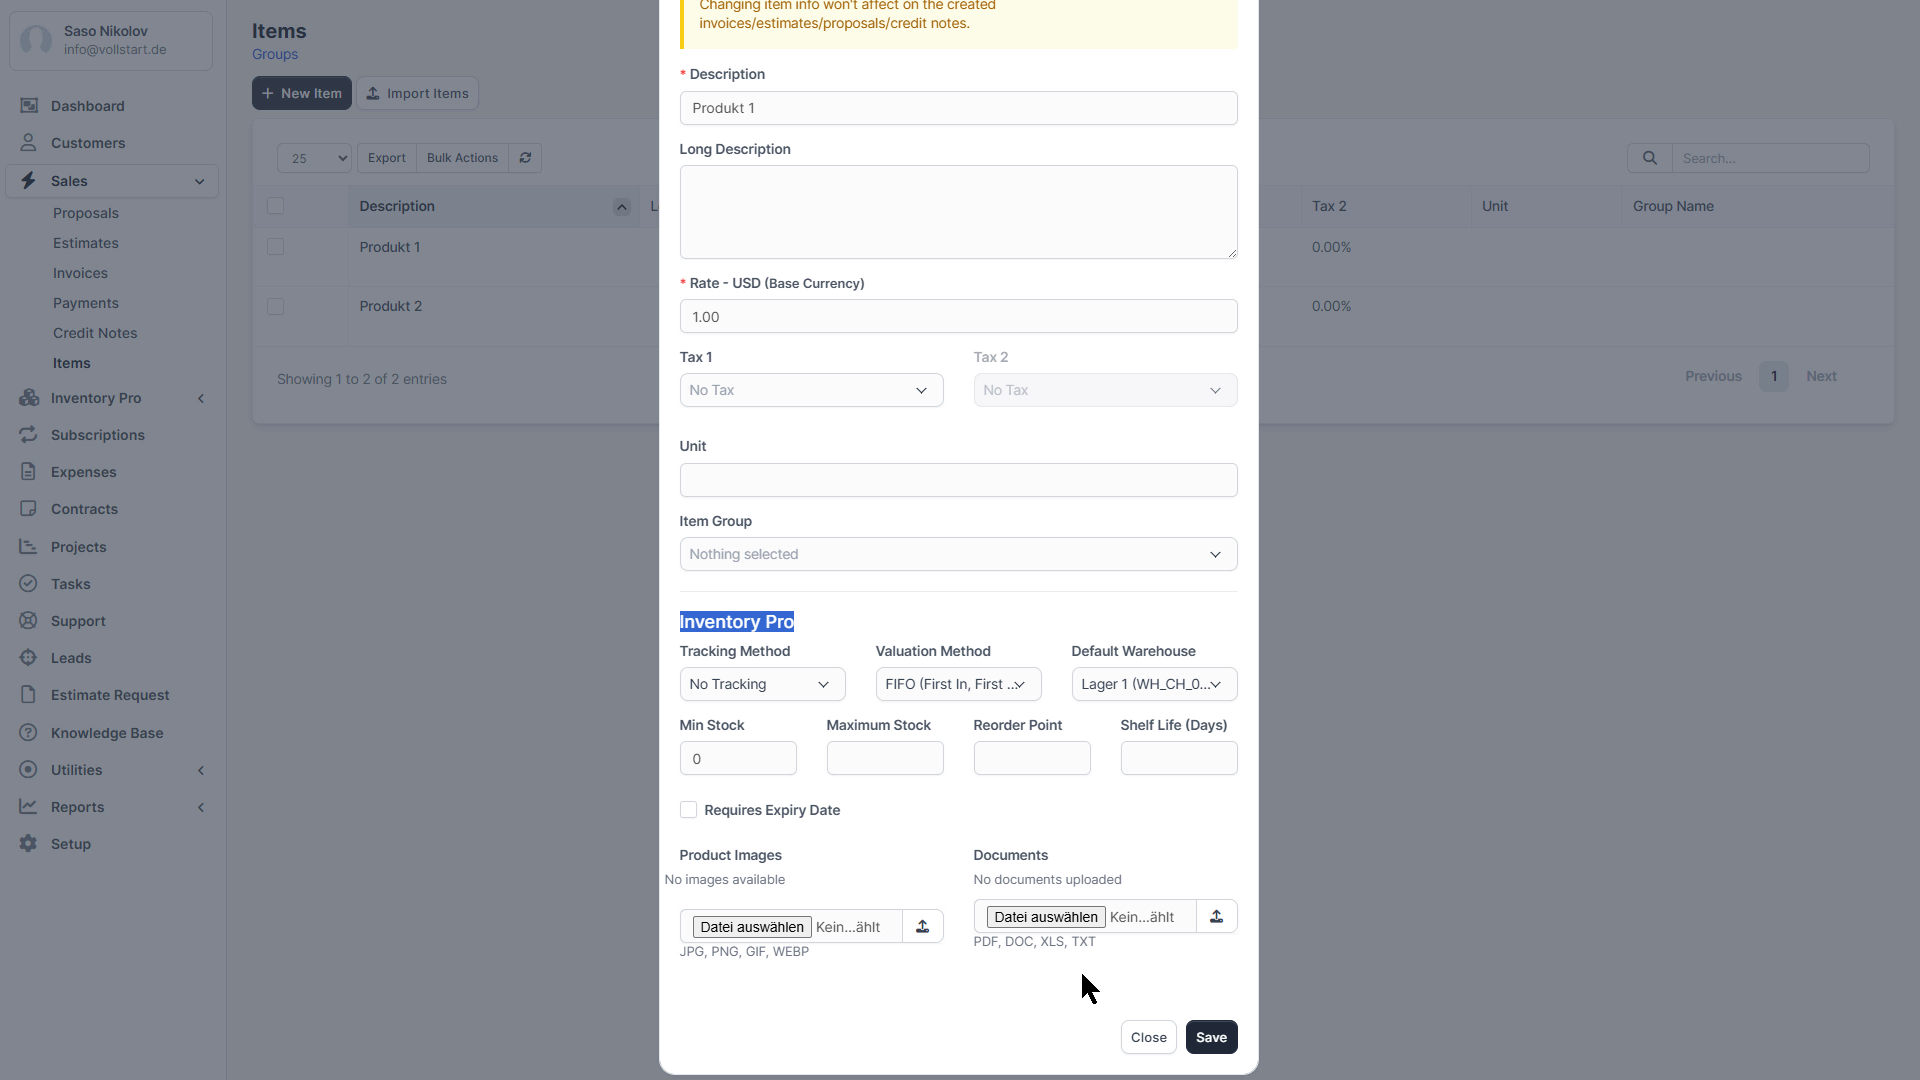
Inventory Pro can link to existing Perfex CRM items (used in invoices and estimates). This allows you to track stock for items you already use in your CRM.
Each item in Perfex CRM can have individual inventory tracking settings. Access these via Sales → Items → Edit Item → Inventory Pro tab.
| Method | Use Case |
|---|---|
| None | Standard items – track quantity only |
| Lot/Batch | Group tracking – food, chemicals, bulk materials |
| Serial Number | Individual tracking – electronics, equipment, vehicles |
| Lot + Serial | Combined – production batch with individual serial numbers |
| Method | How It Works | Best For |
|---|---|---|
| FIFO | Oldest stock consumed first (by received date) | Non-perishable goods (default) |
| FEFO | Earliest expiry consumed first | Perishable goods, pharmaceuticals |
| Average Cost | Weighted average of all stock layers | Standard accounting |
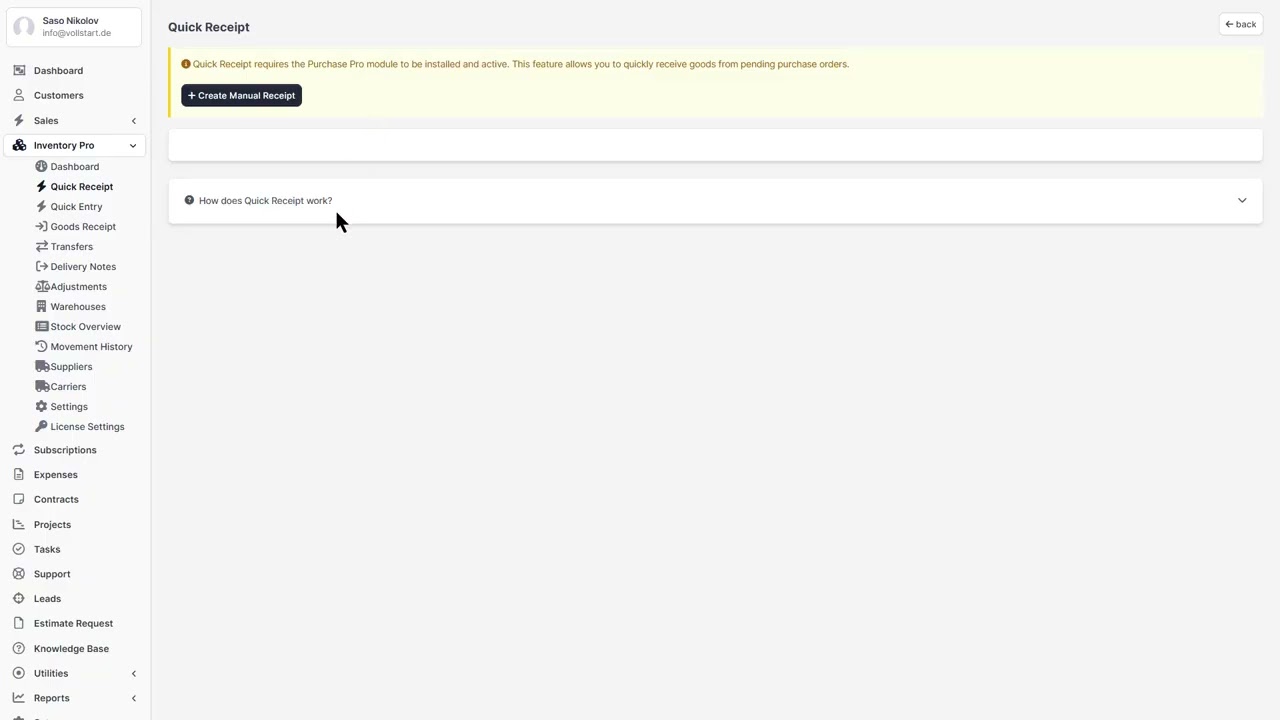
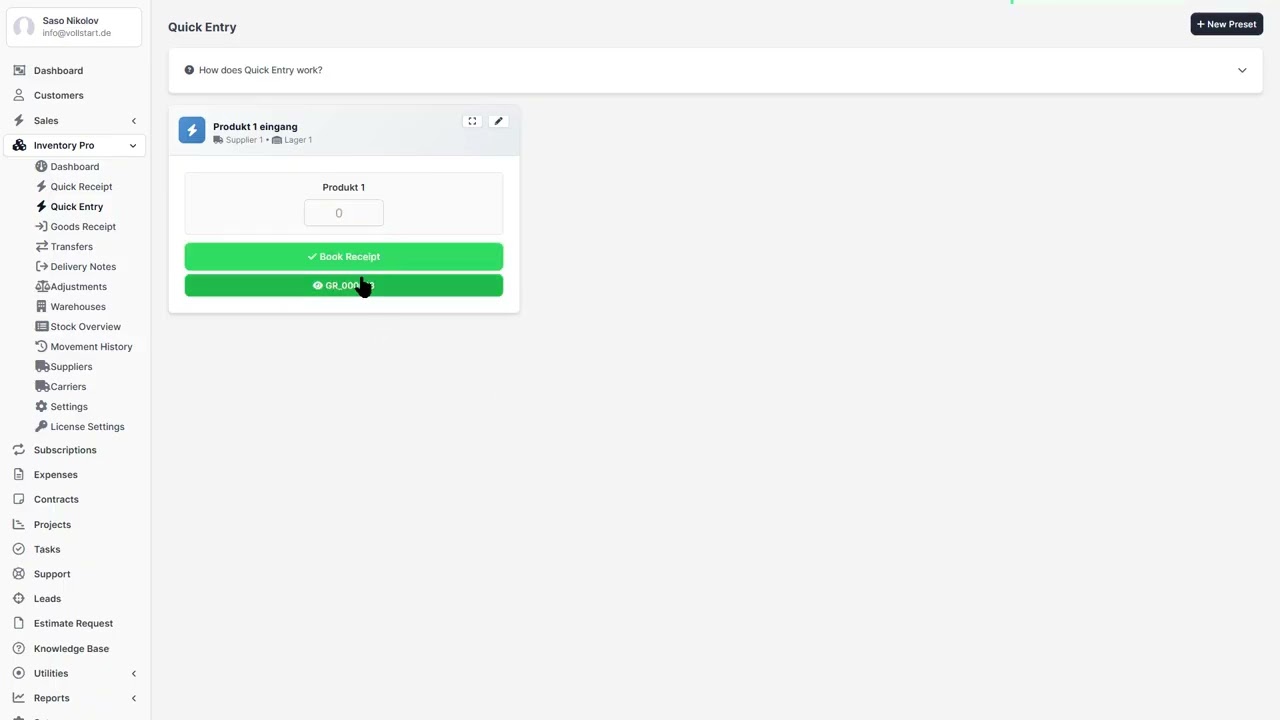
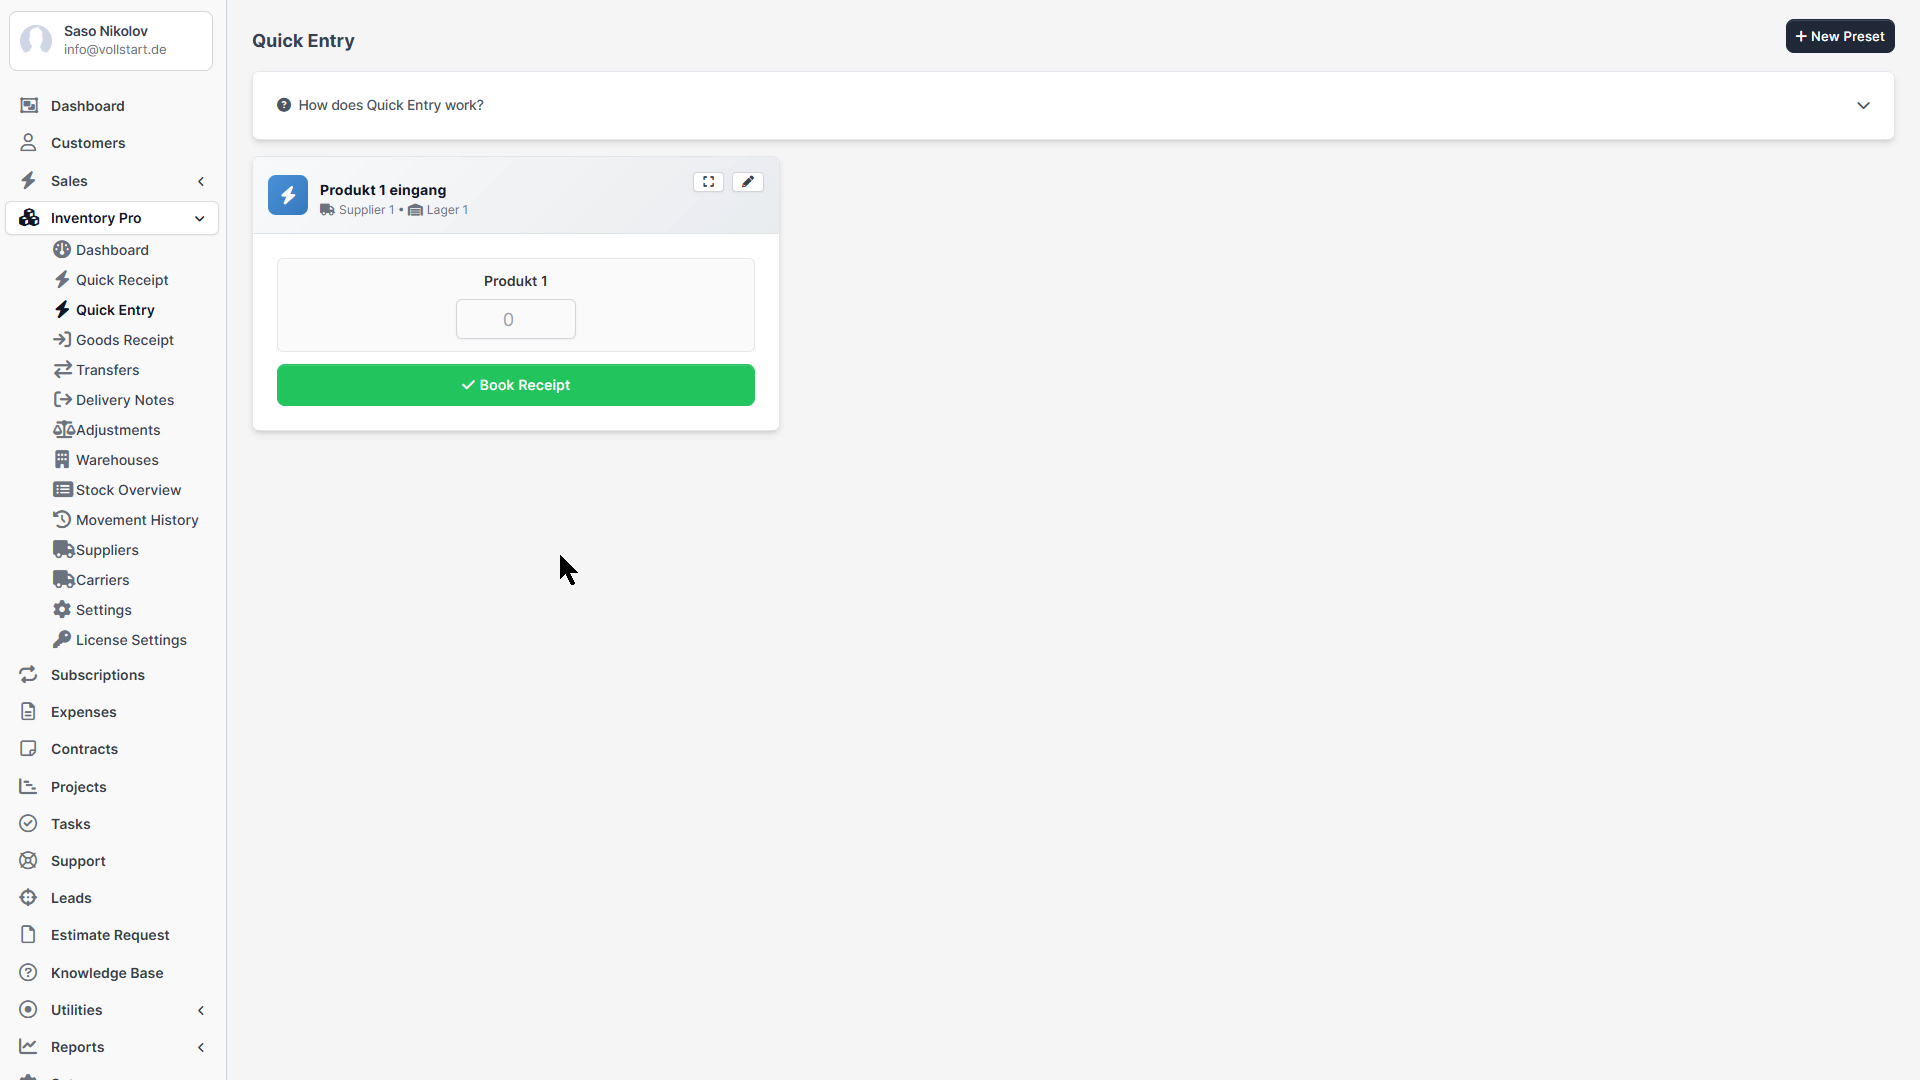
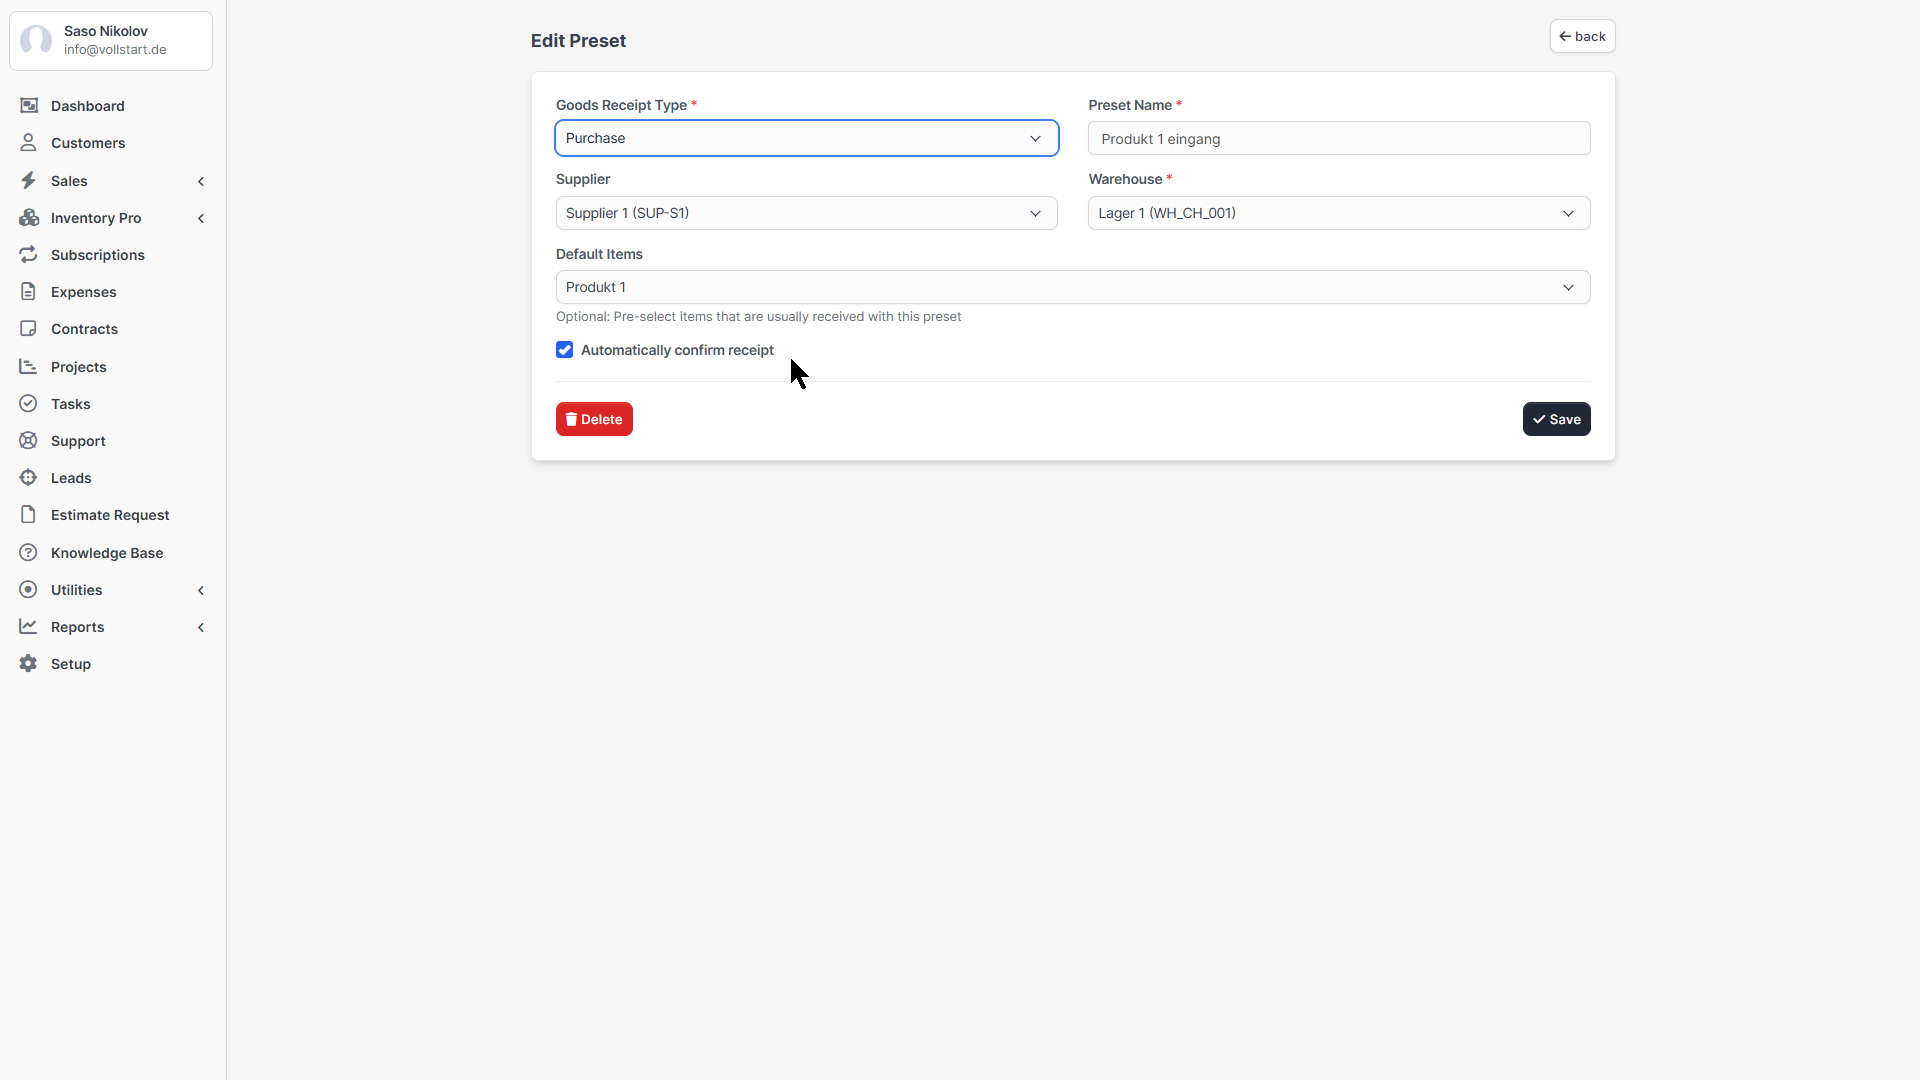
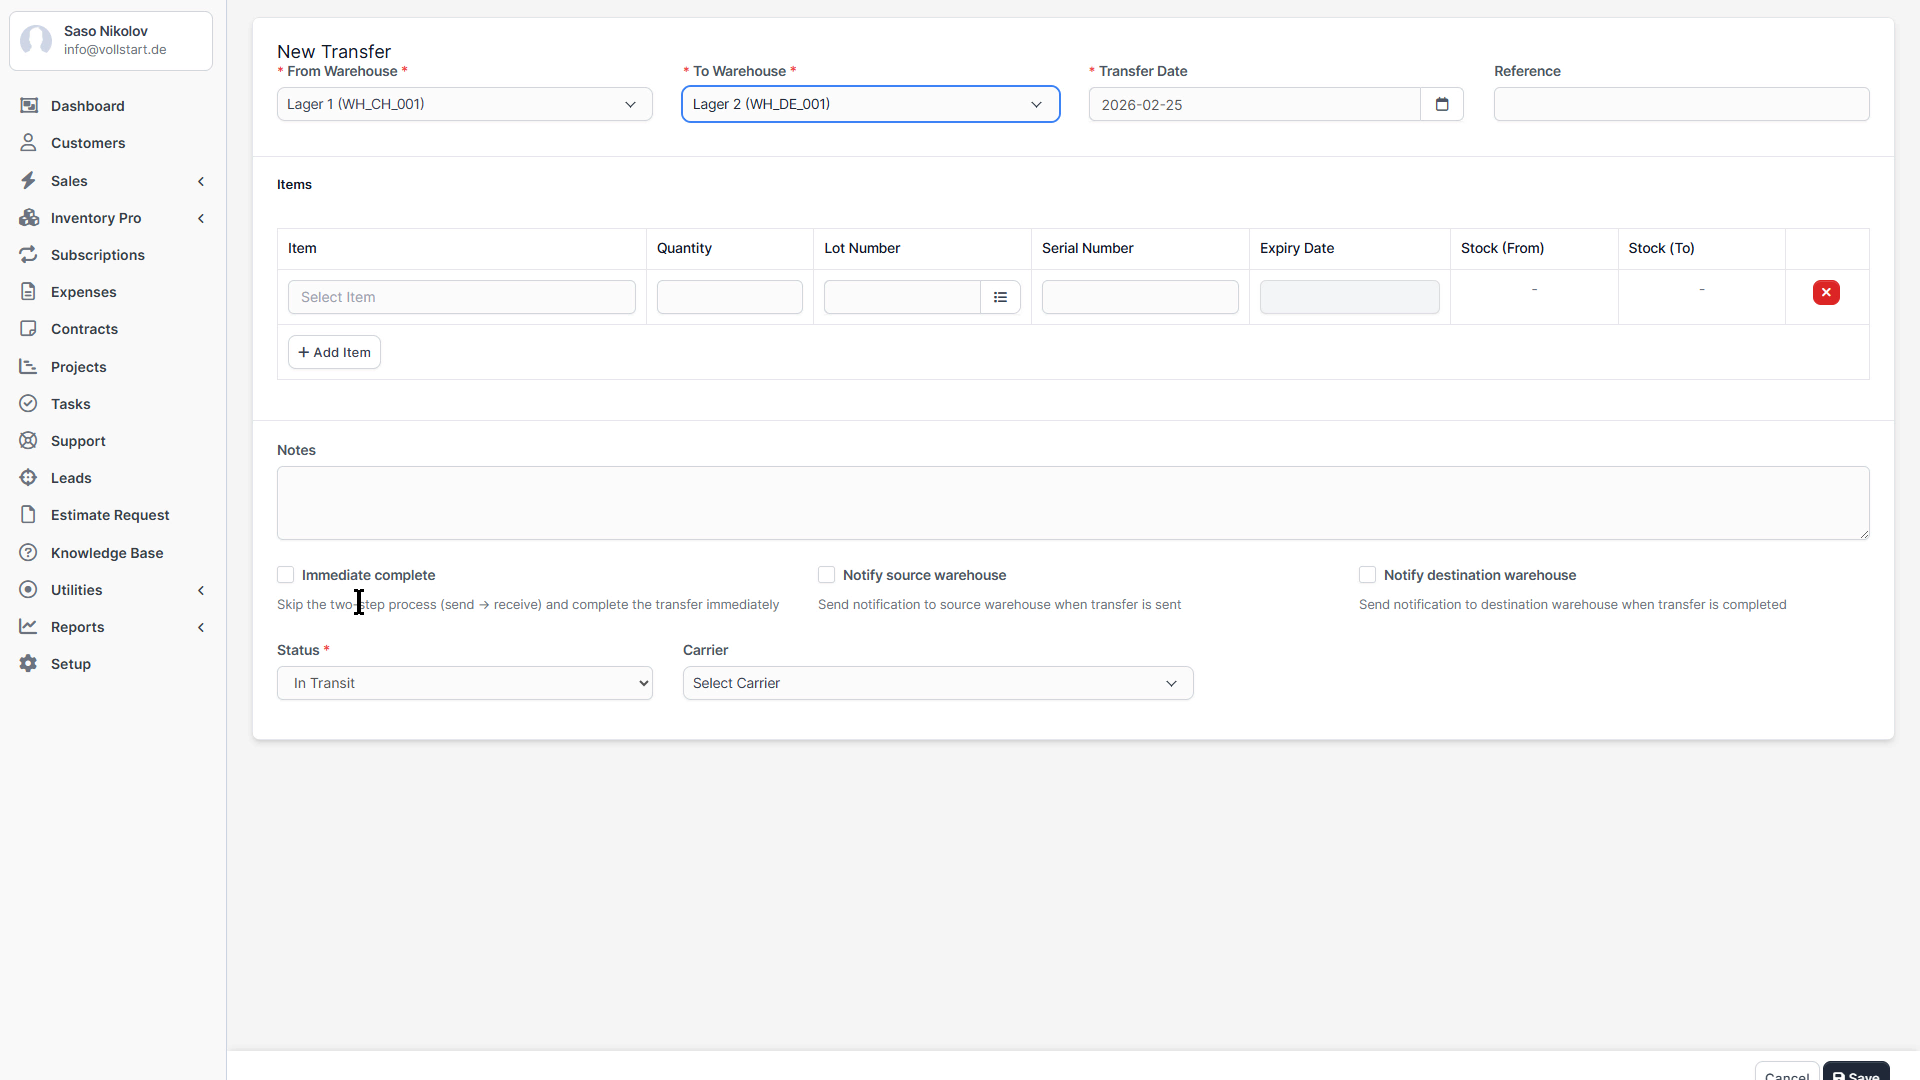
For fast day-to-day operations, Inventory Pro offers two streamlined entry modes accessible directly from the sidebar menu.
A simplified form for recording incoming stock:
Create reusable presets for recurring receipts (e.g., weekly supplier deliveries):
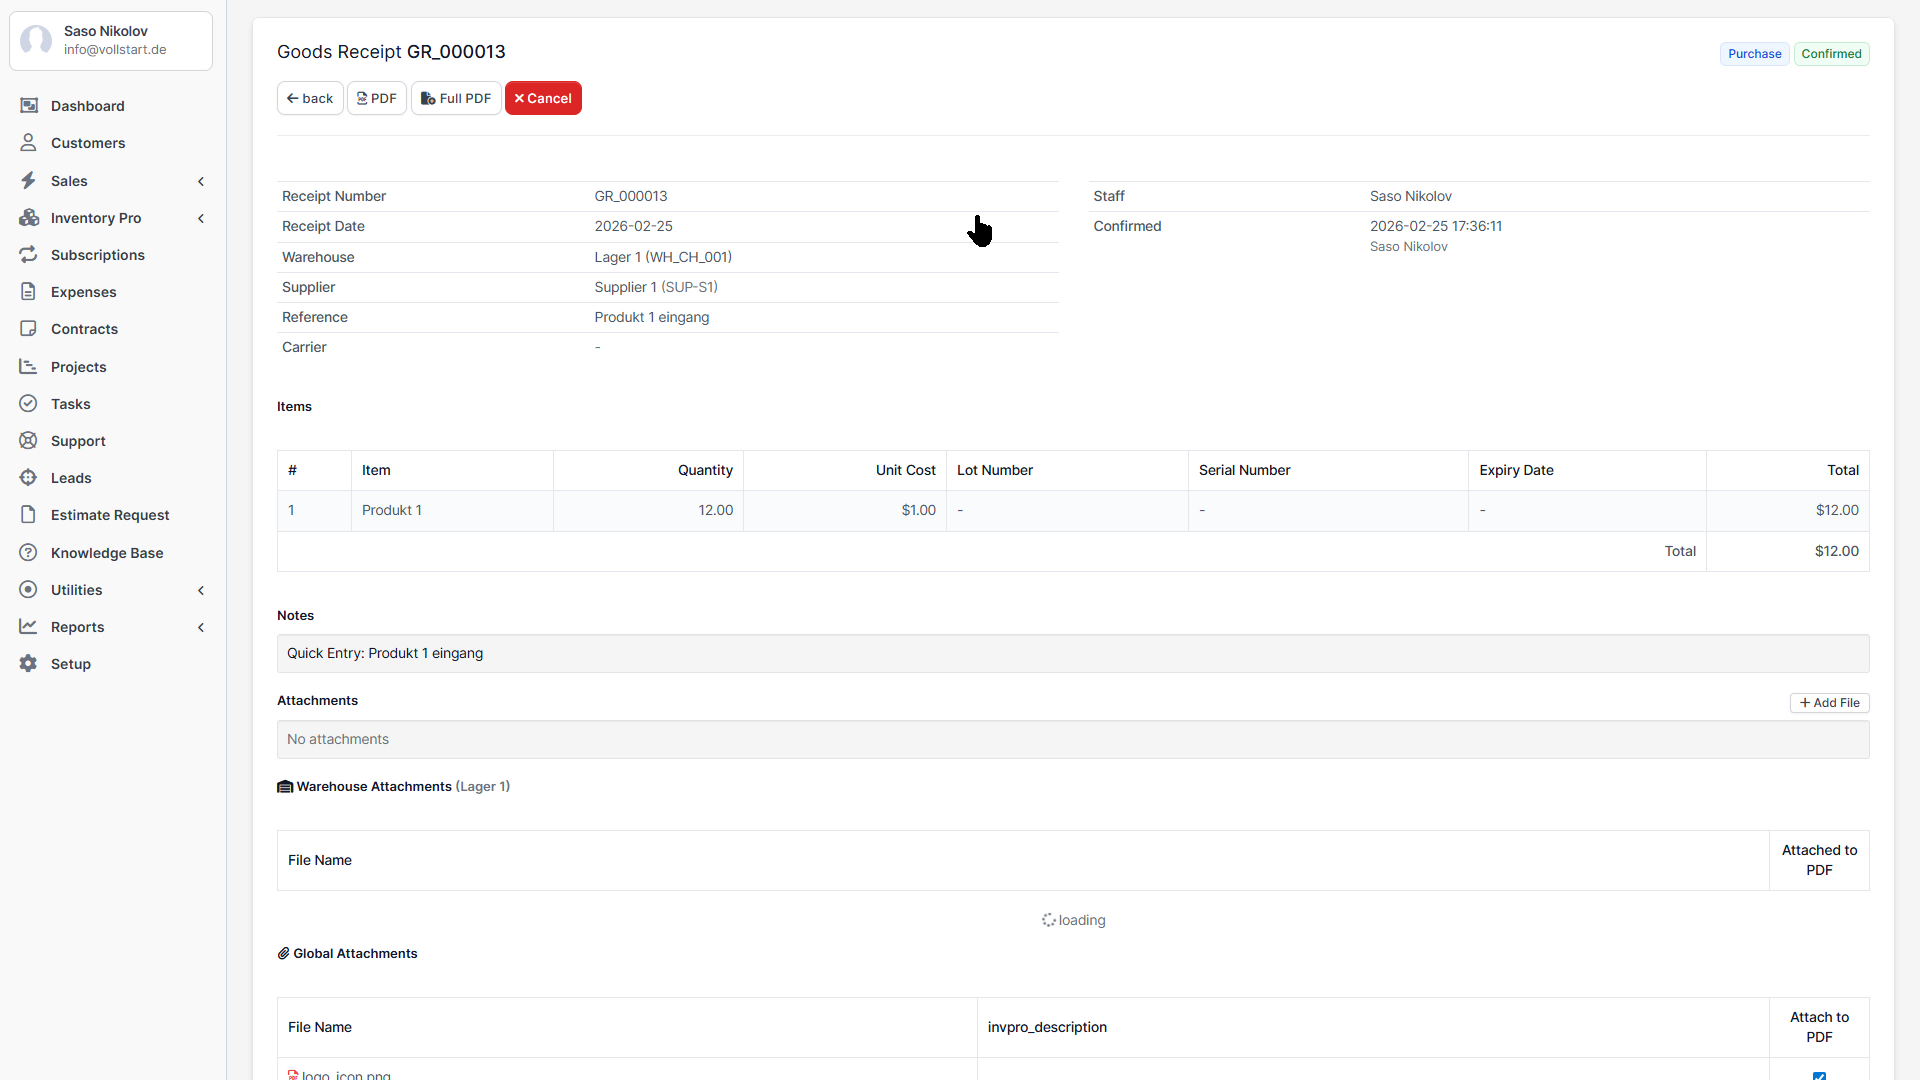
Record incoming stock into a warehouse.
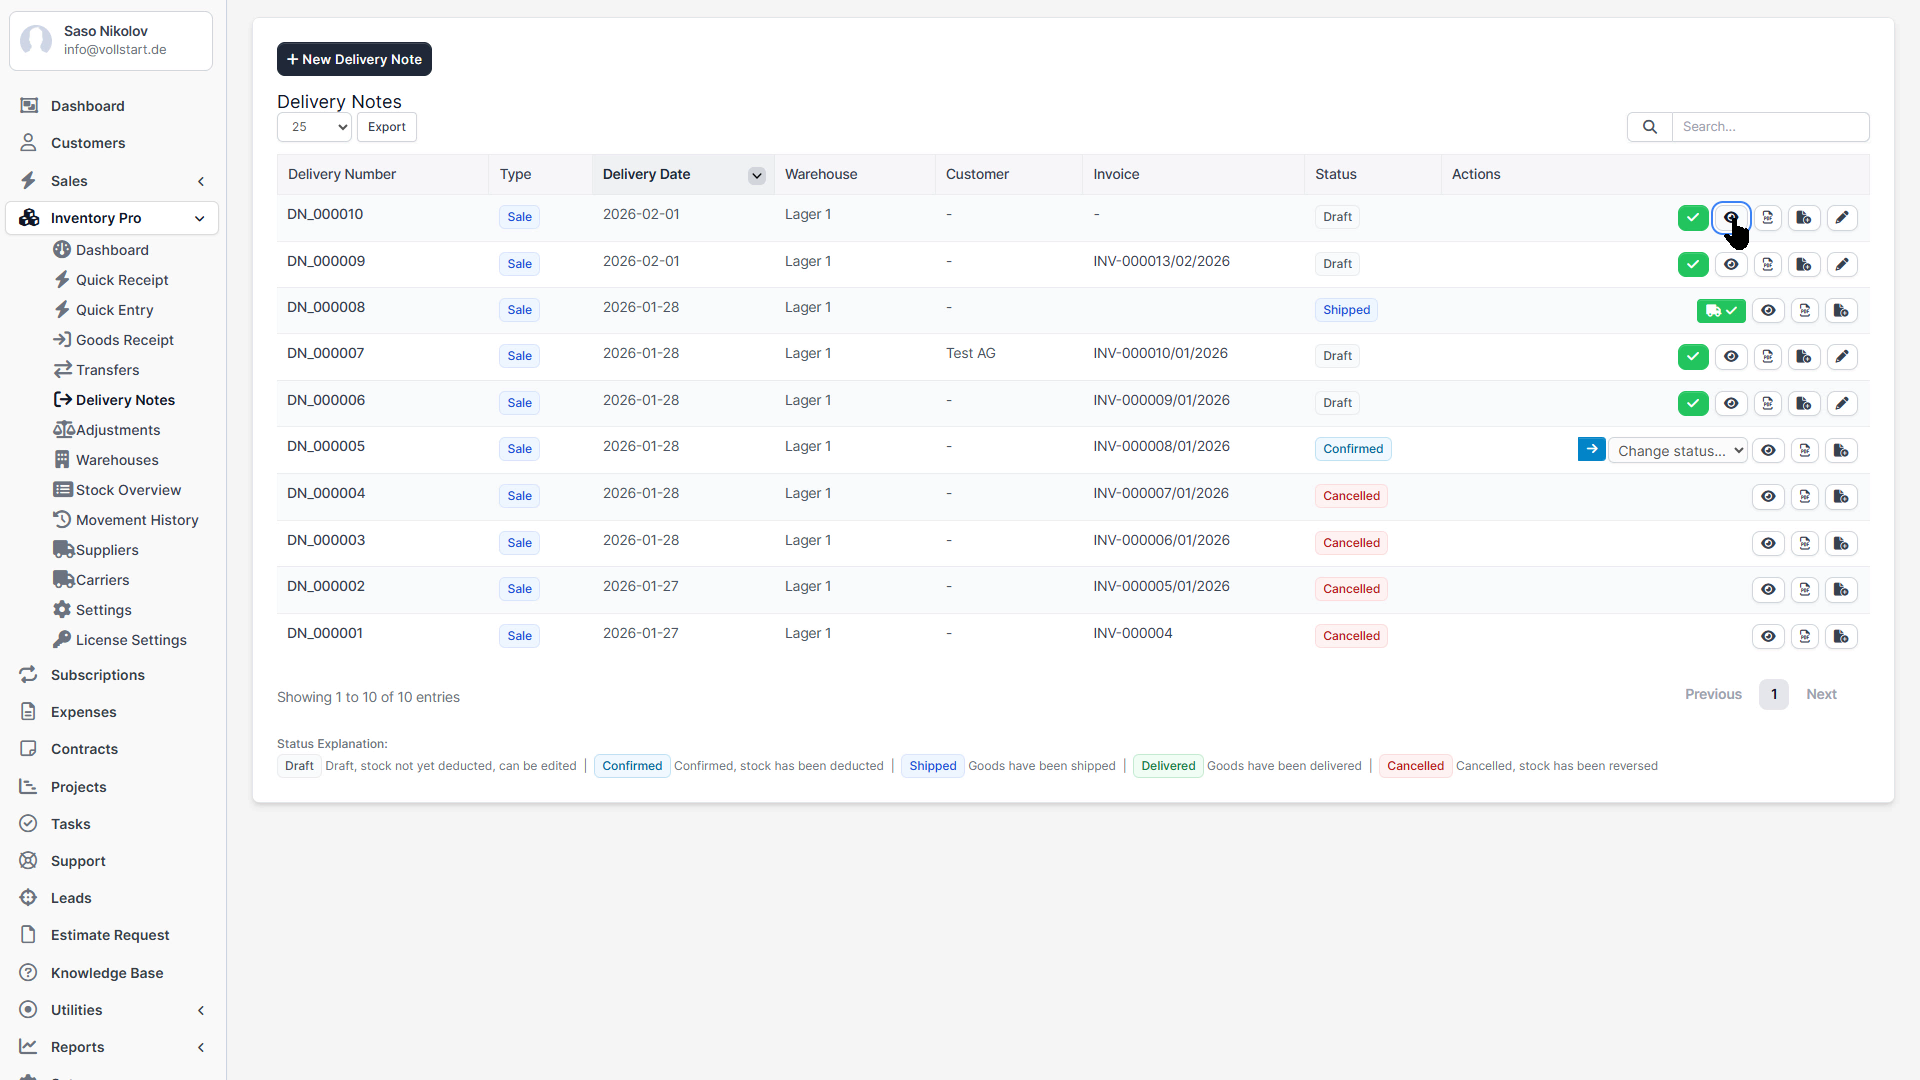
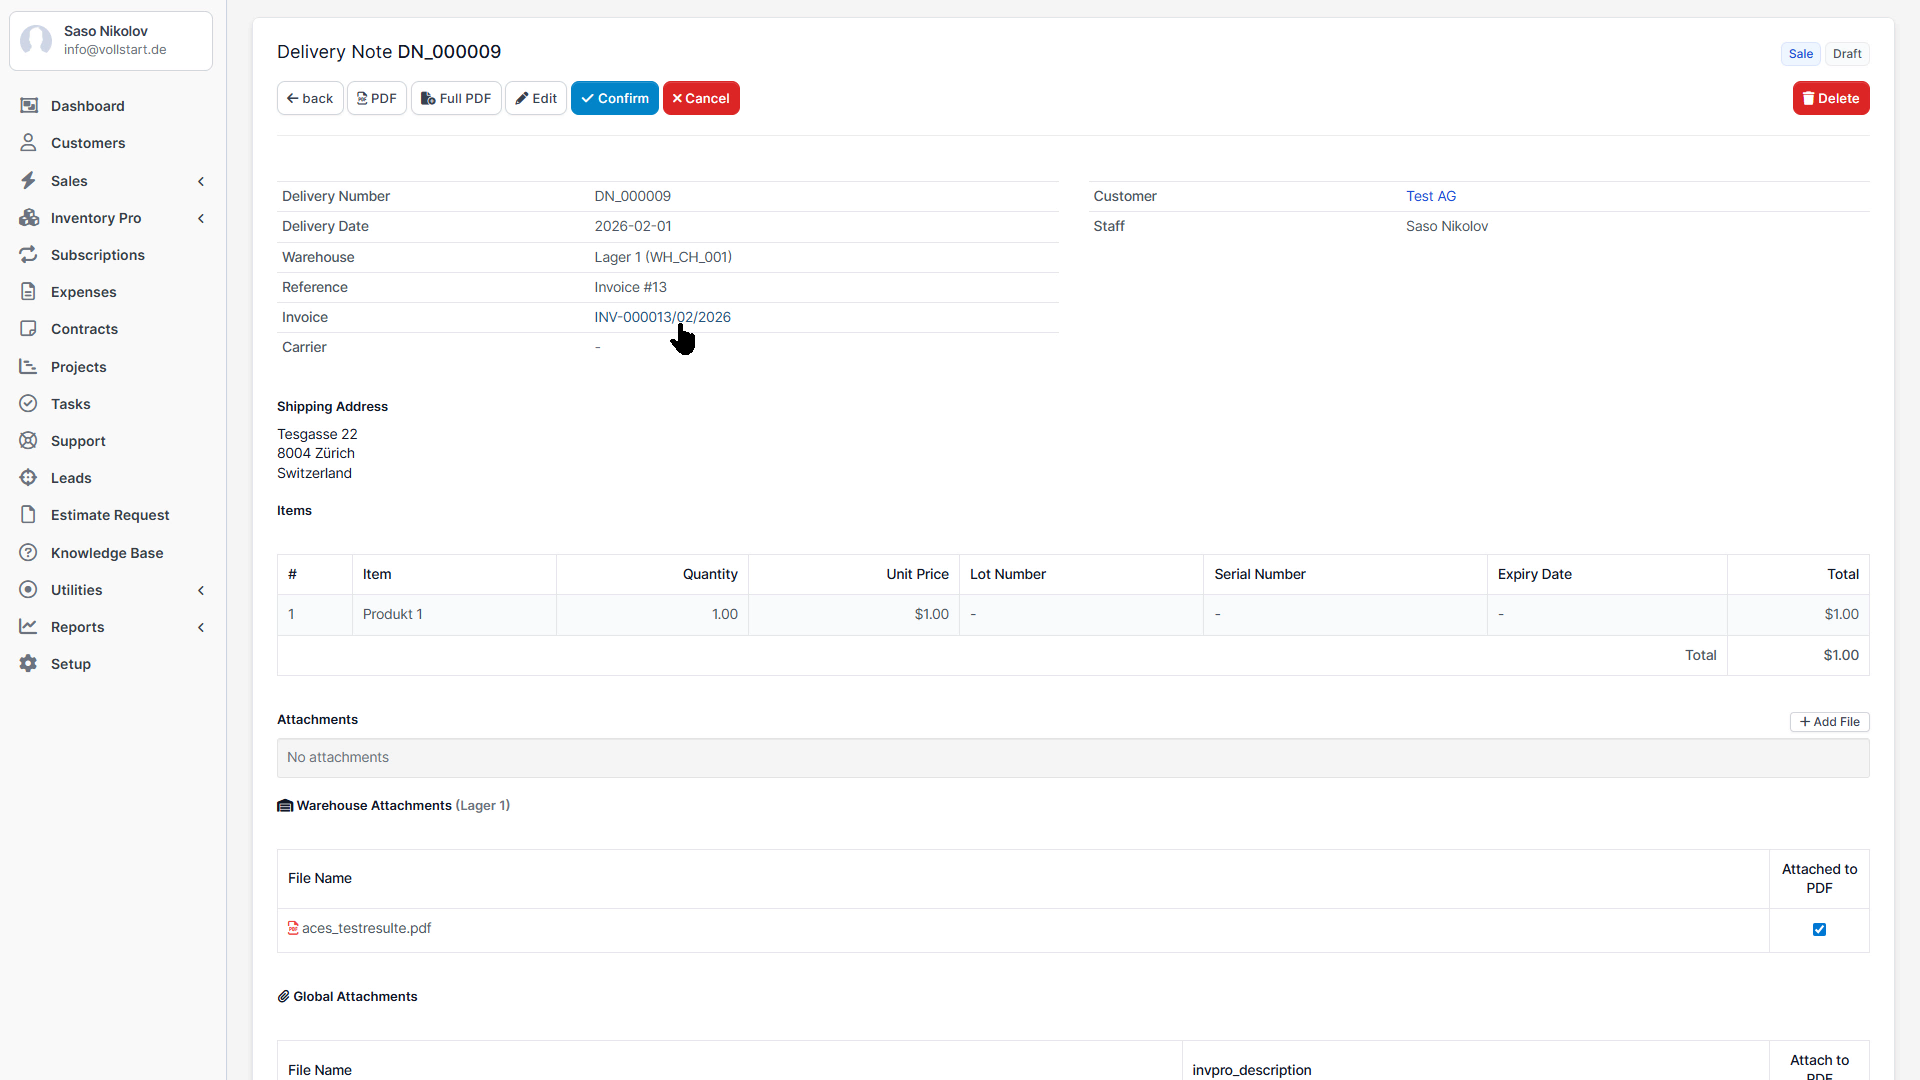
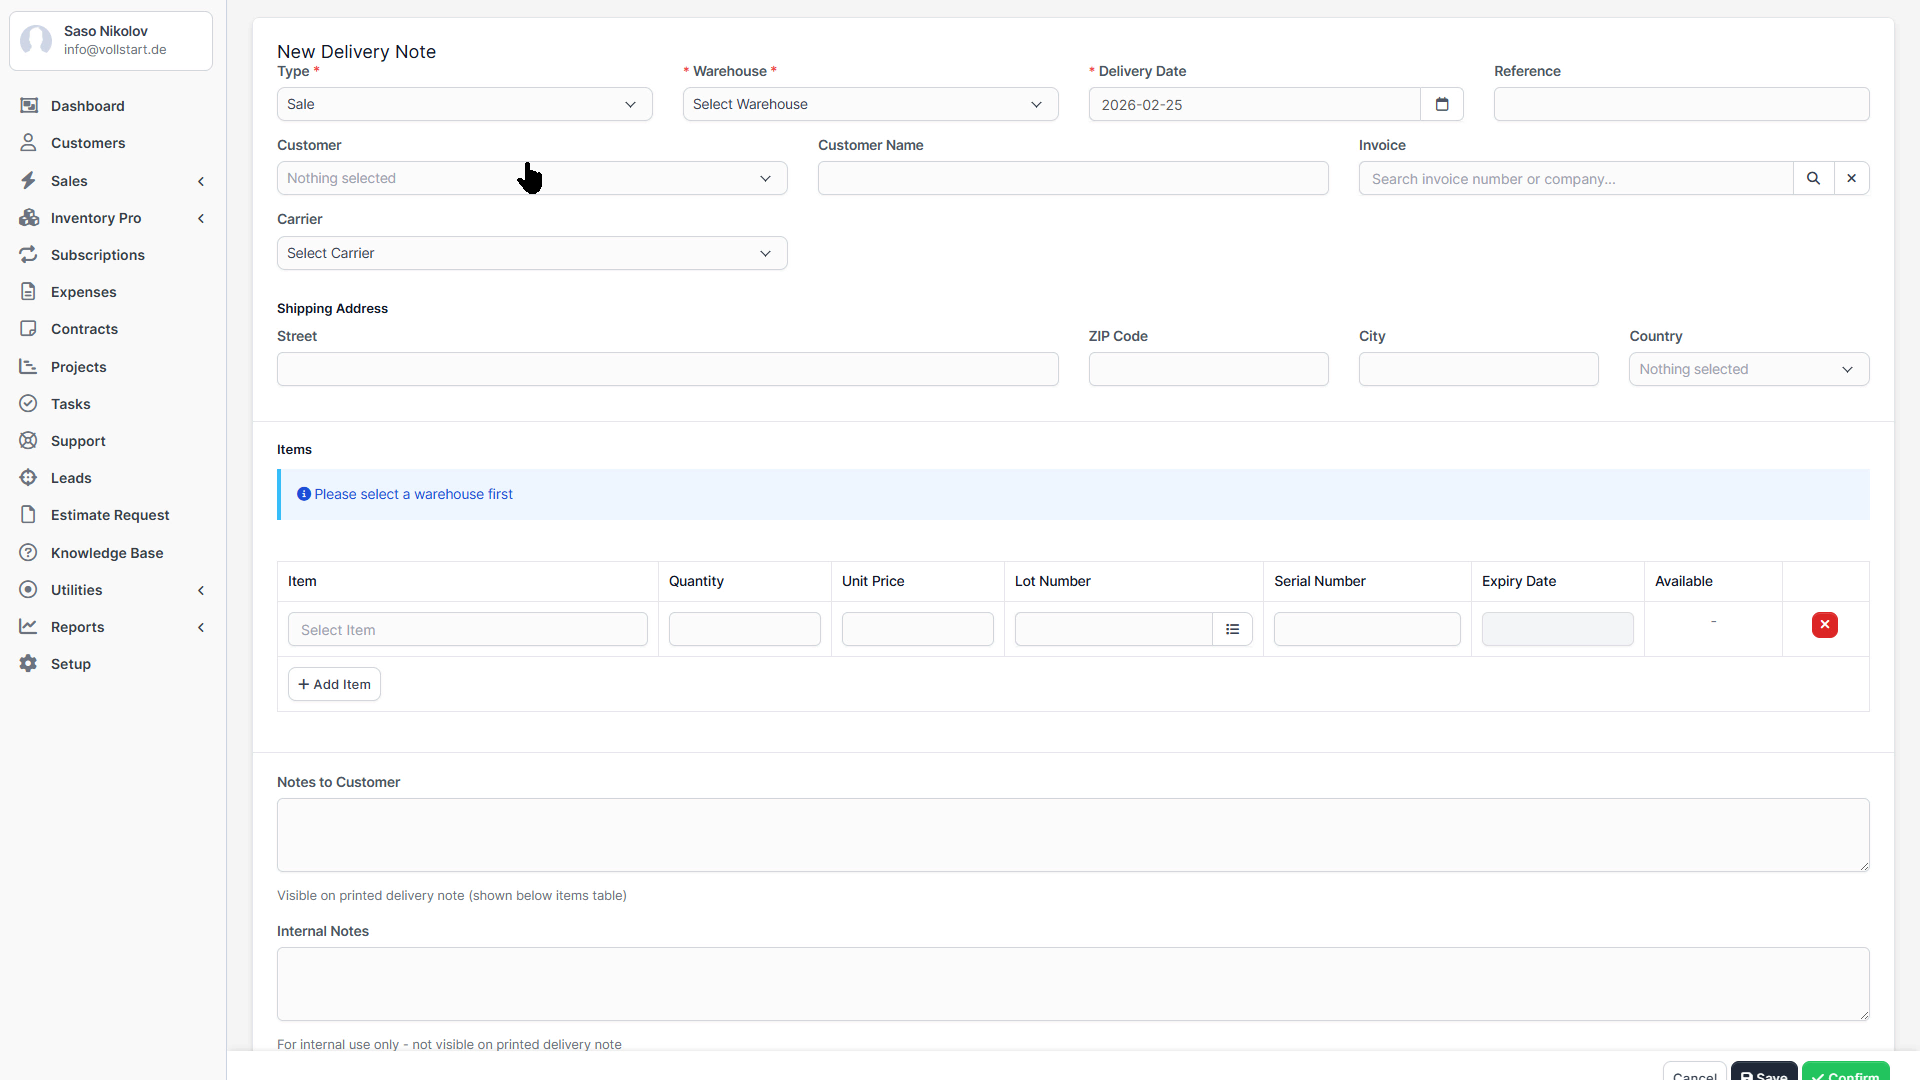
Record outgoing stock from a warehouse.
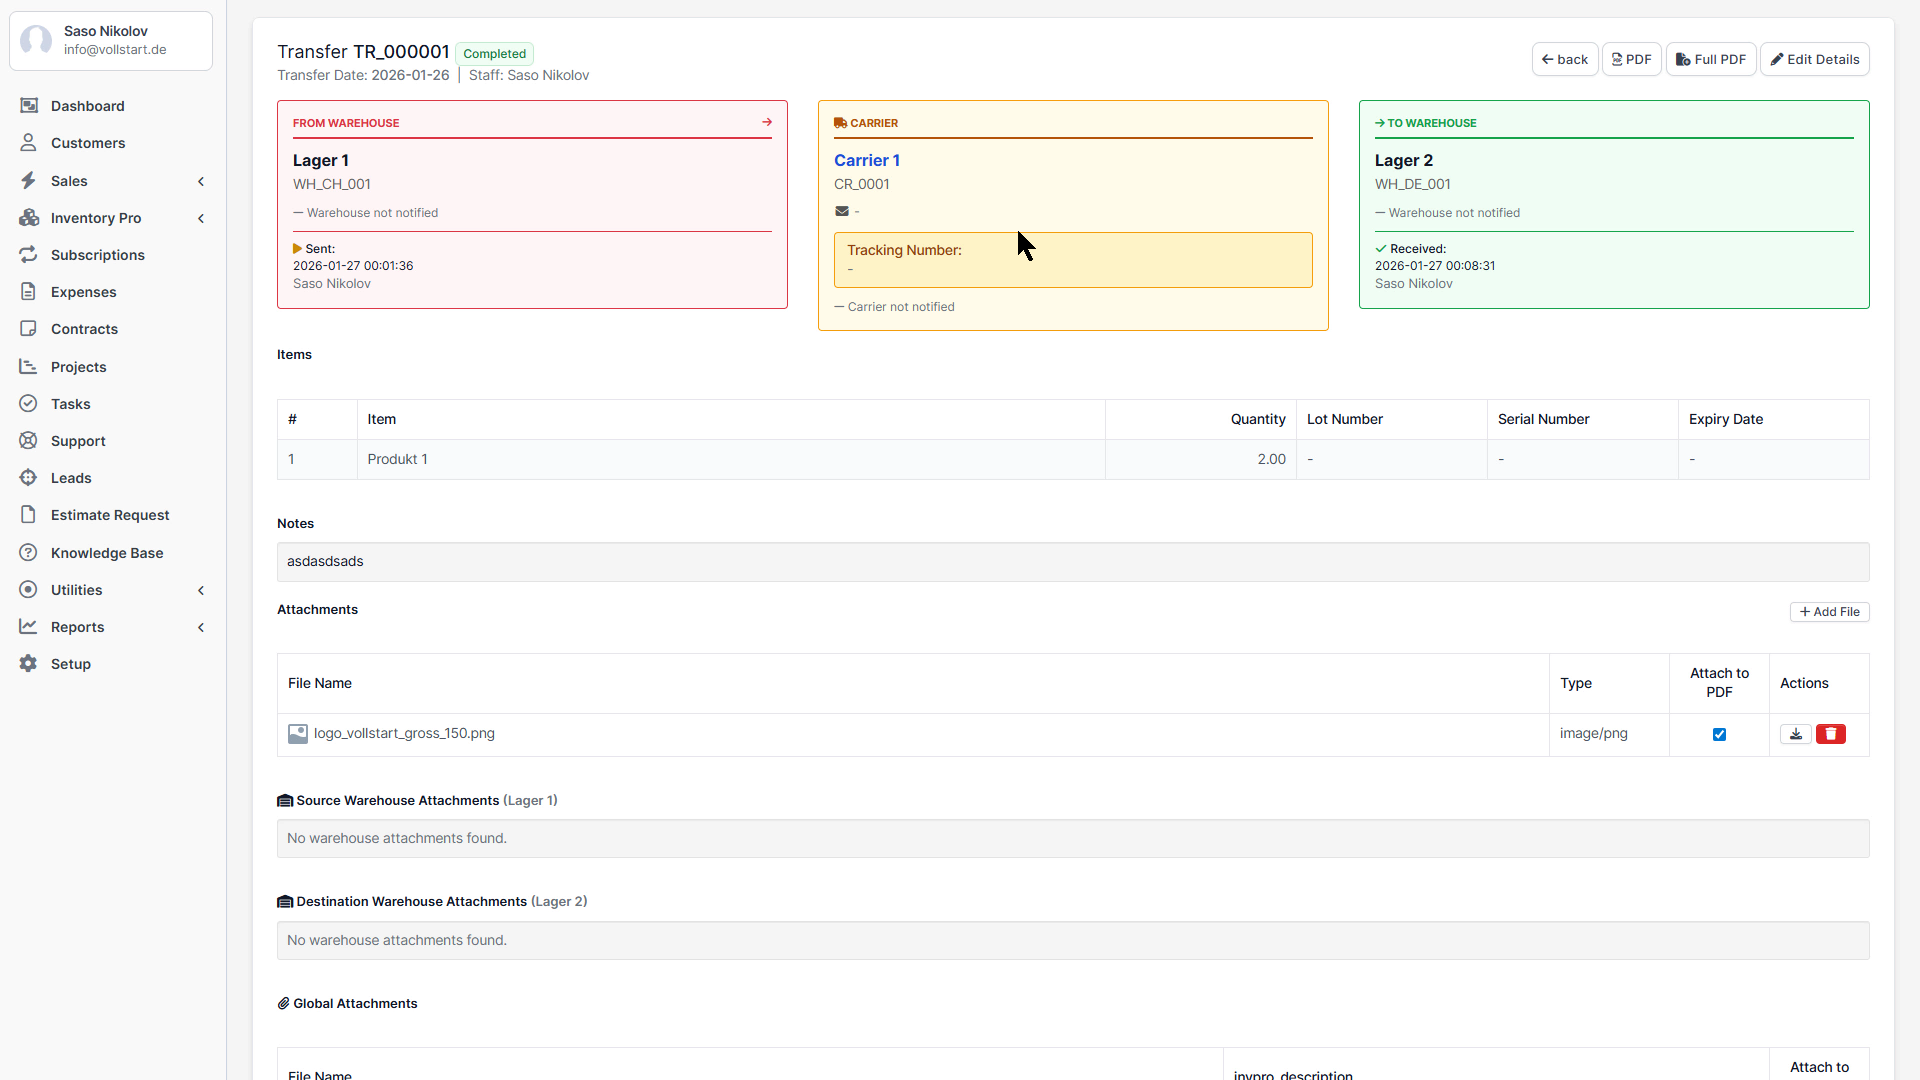
Move stock between warehouses.
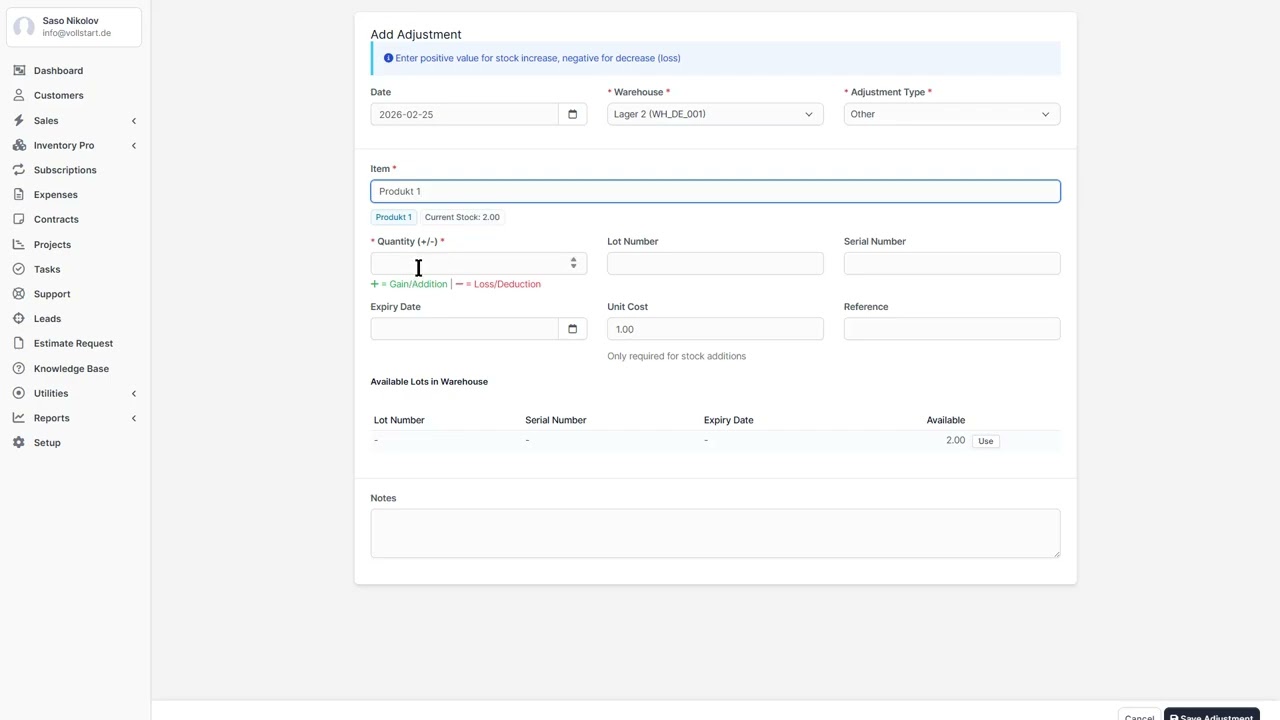
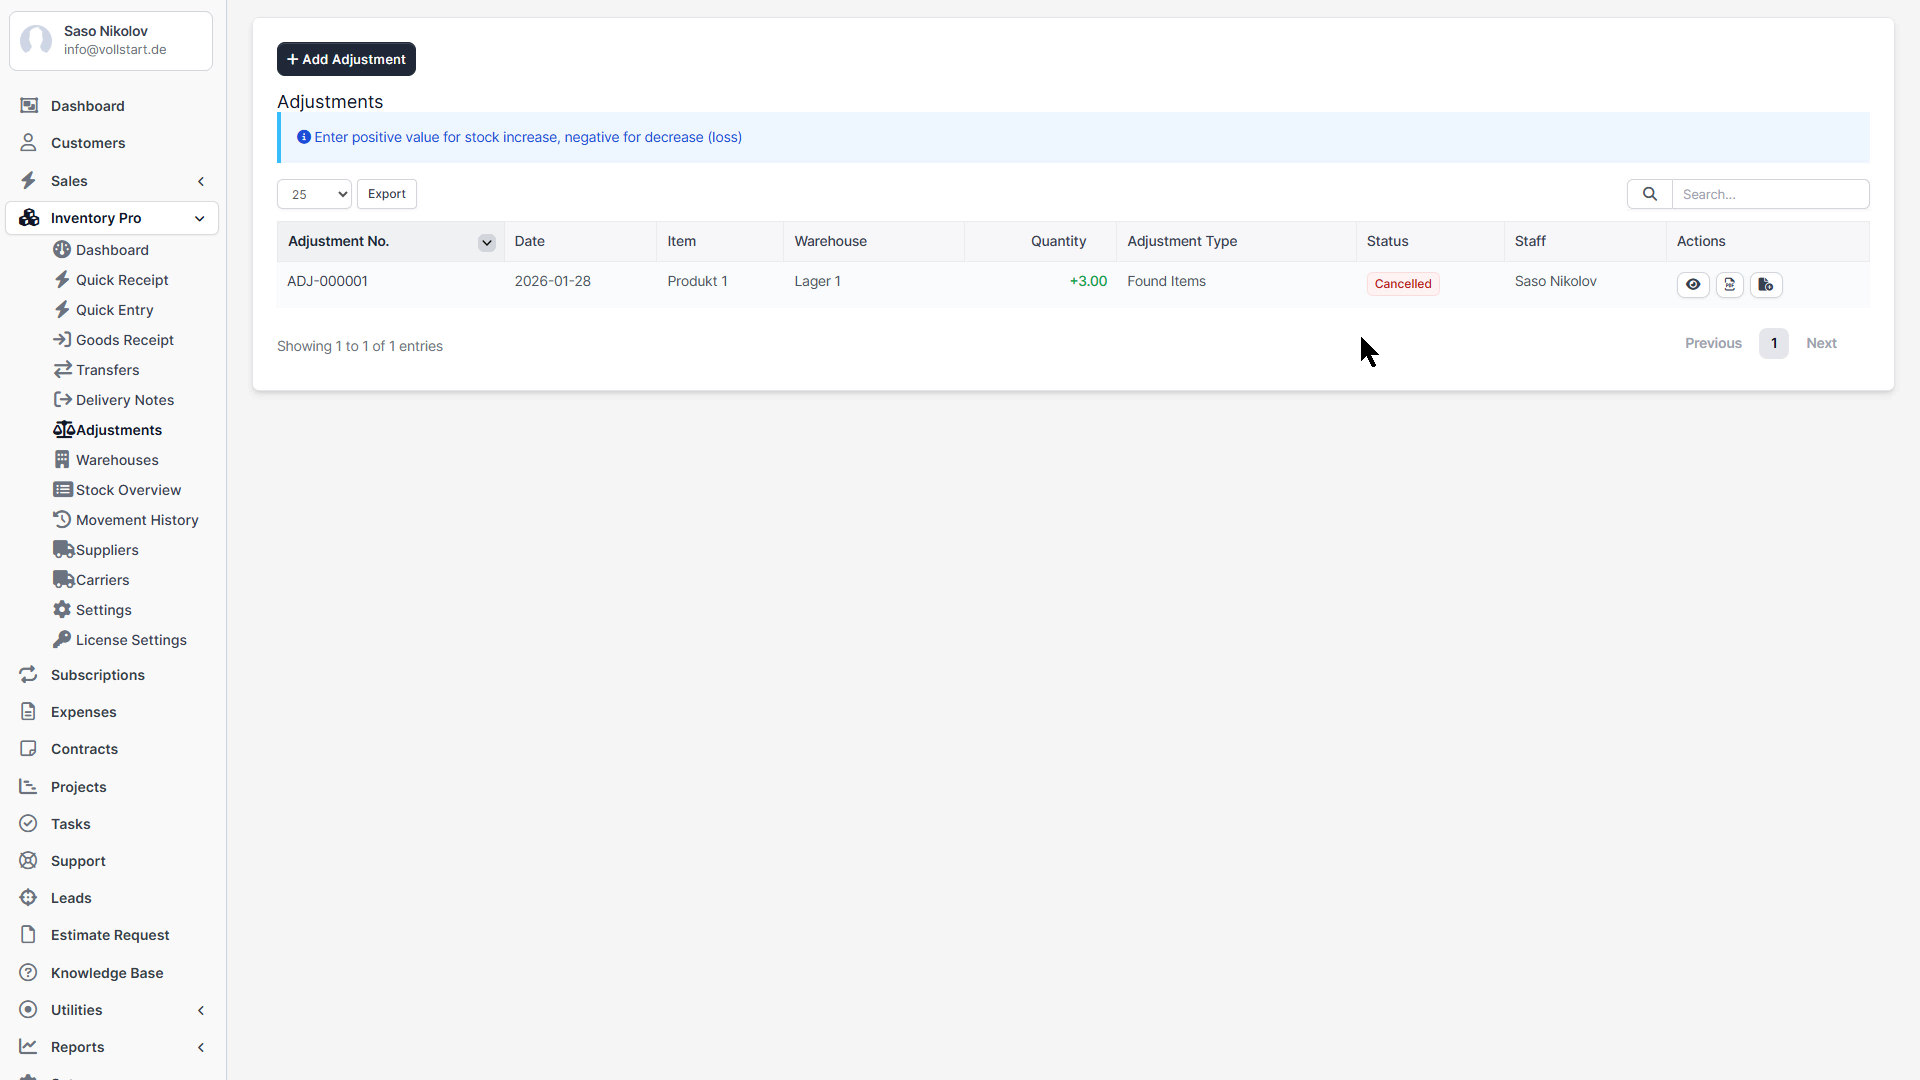
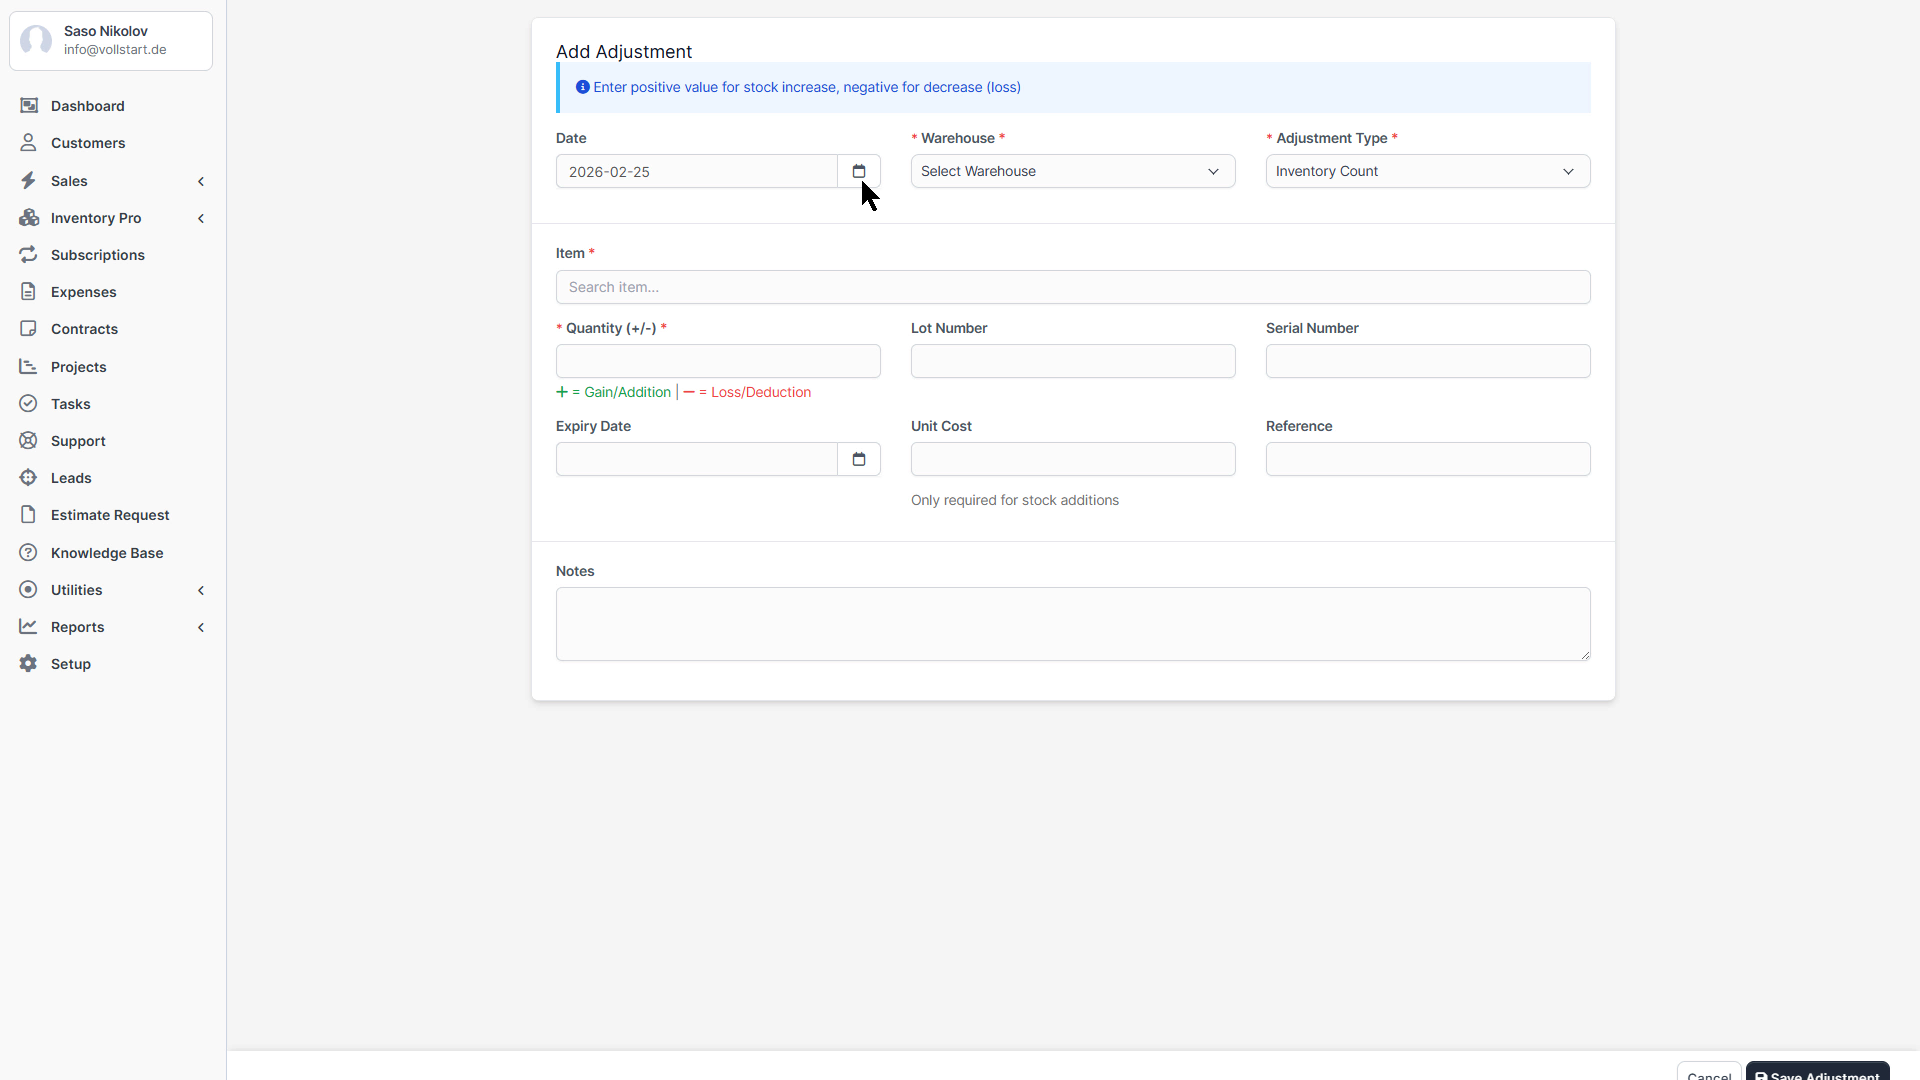
Correct stock levels with a reason.
Perform physical stock counts.
| Status | Description |
|---|---|
| Draft | Document created but not yet confirmed. No stock effect. |
| Confirmed | Document confirmed. Stock levels updated. |
| Cancelled | Document cancelled. Stock effect reversed. |
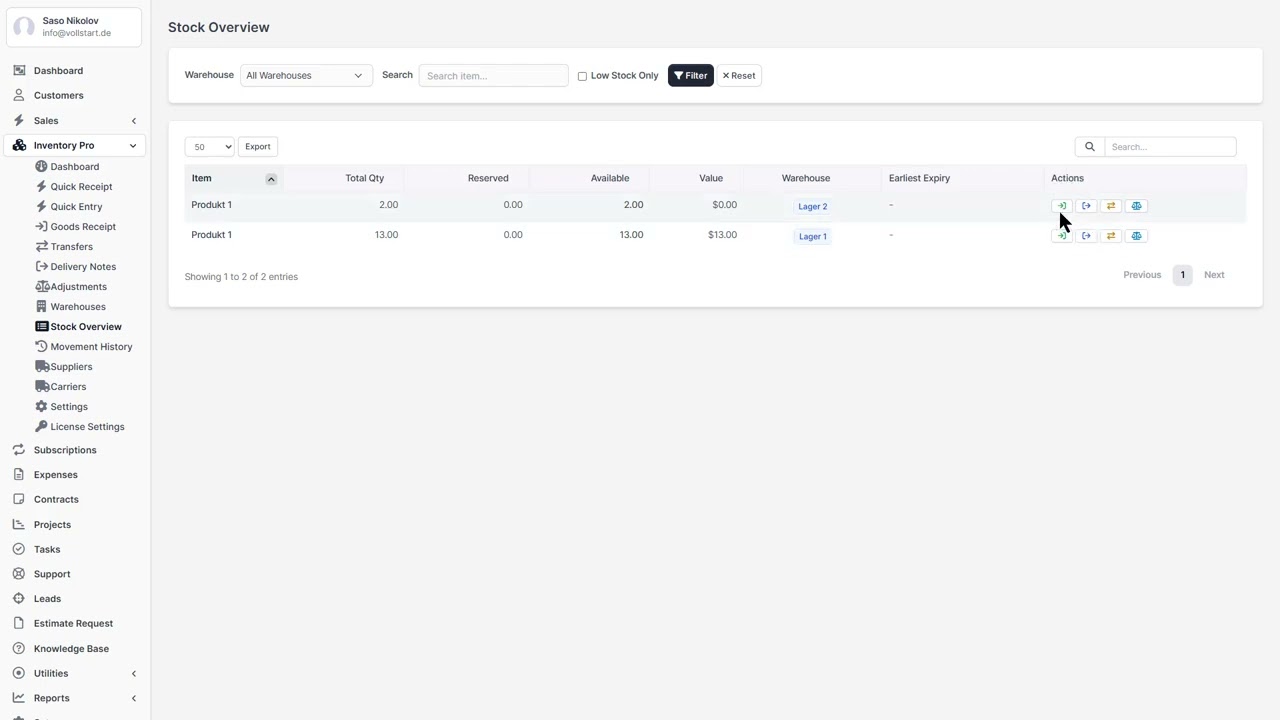
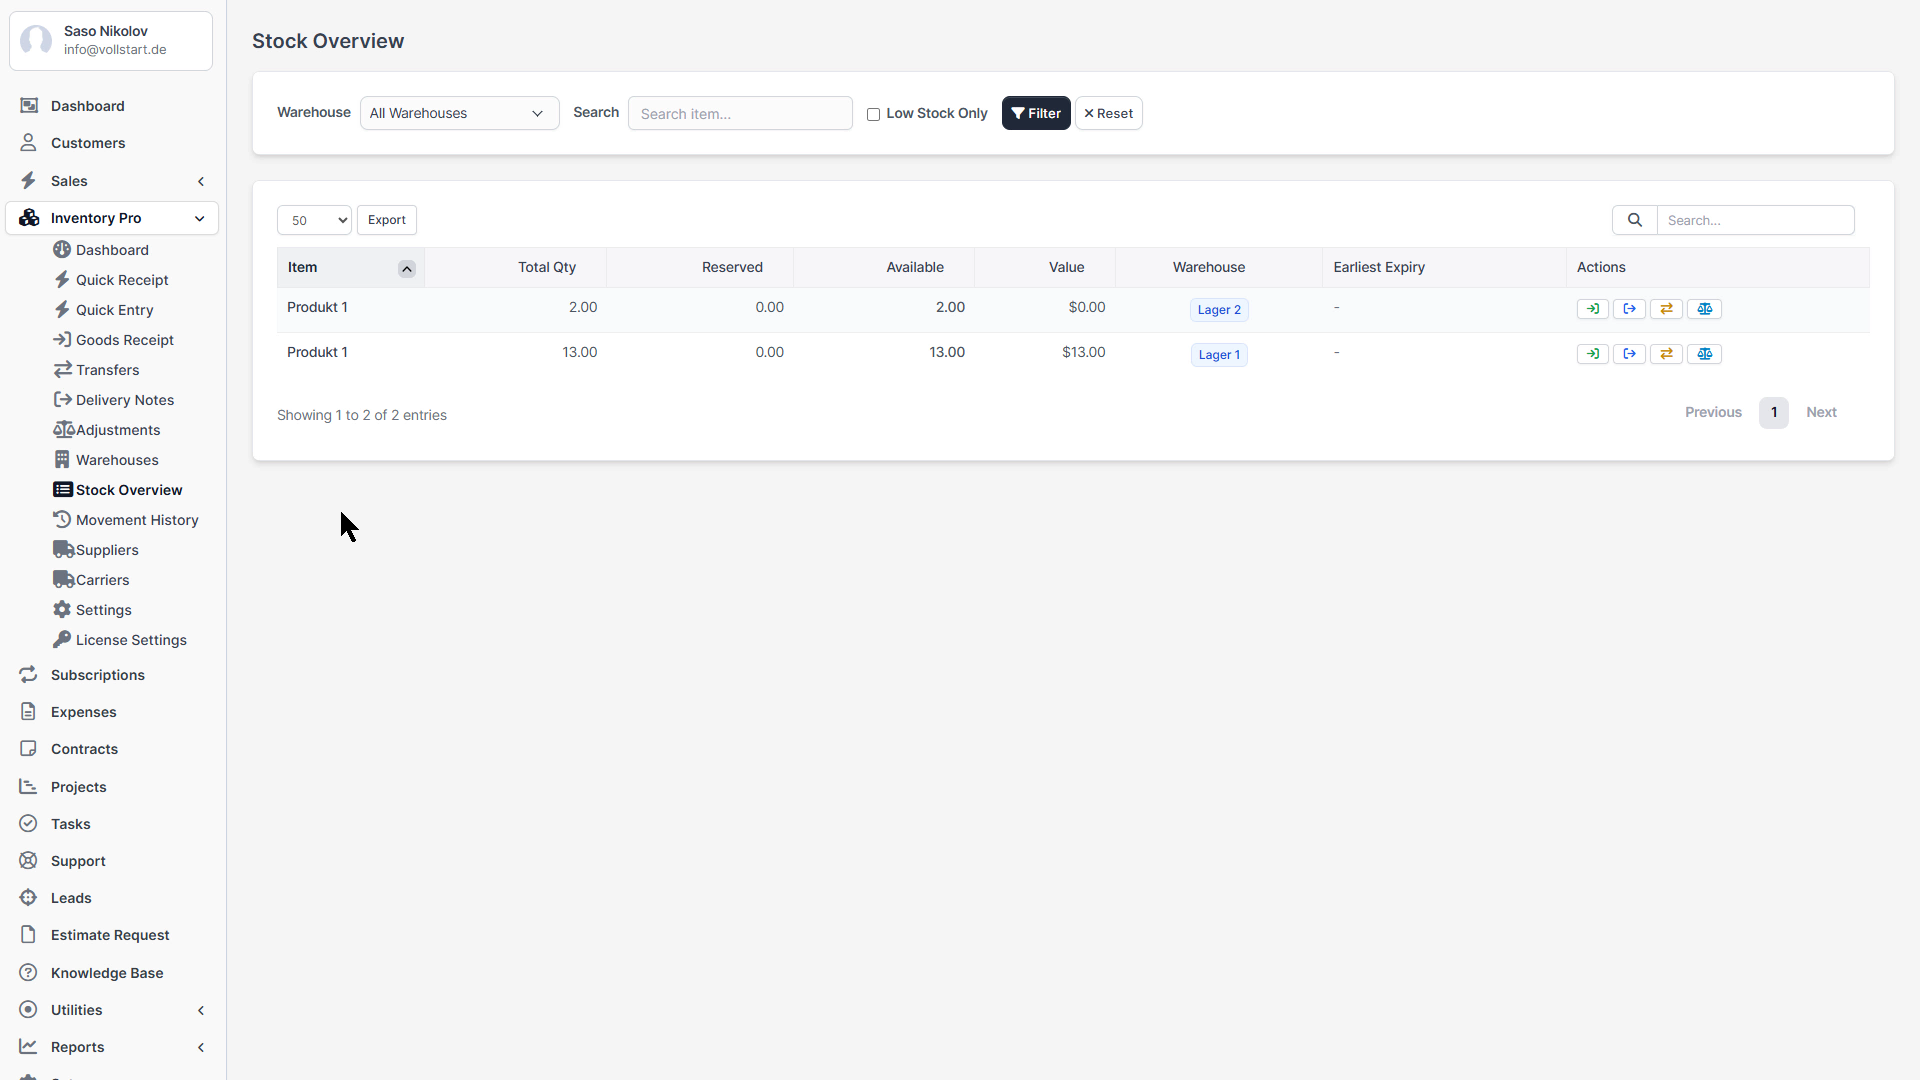
The Stock Overview provides a comprehensive, filterable view of all stock across your warehouses.
| Column | Description |
|---|---|
| Item | Name and SKU |
| Lot / Serial | Batch number and/or serial number |
| Expiry Date | Expiration date (highlighted if expiring soon or expired) |
| Quantity | Total quantity in stock |
| Reserved | Quantity reserved for pending deliveries |
| Available | Quantity − Reserved = actually available |
| Warehouse | Storage location |
| Unit Cost | Cost per unit (from goods receipt) |
From the stock overview, you can directly:
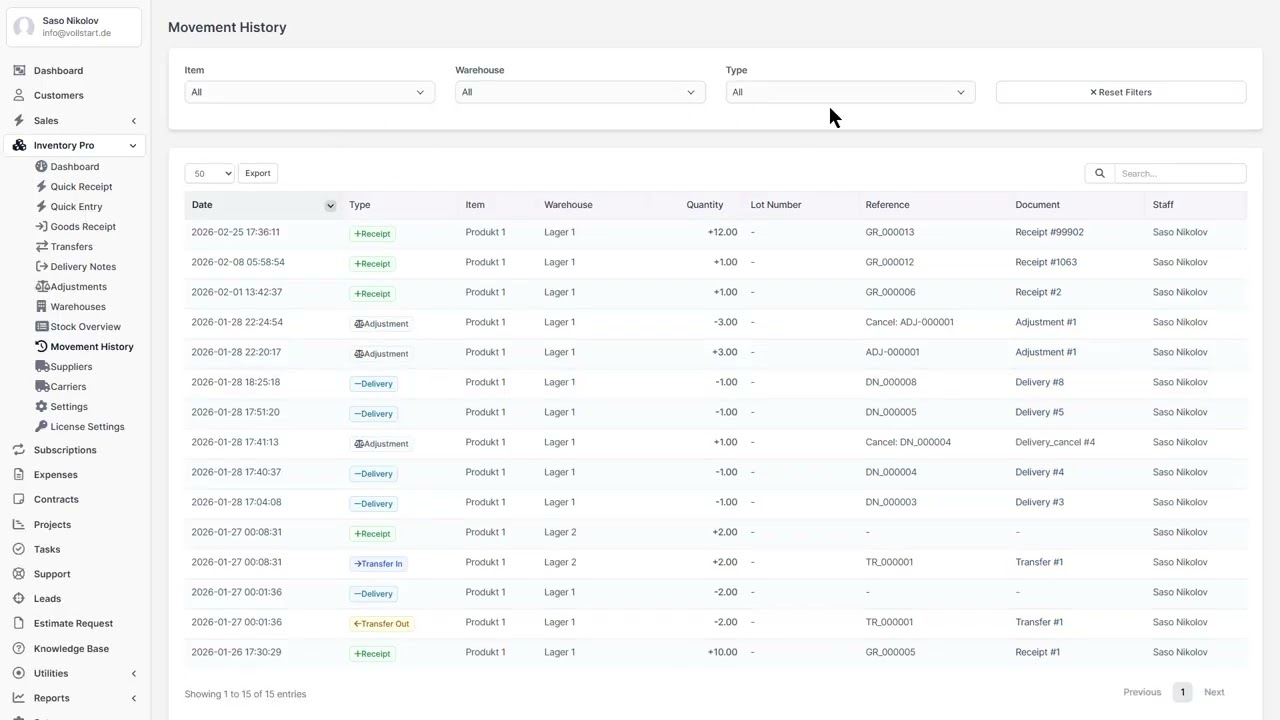
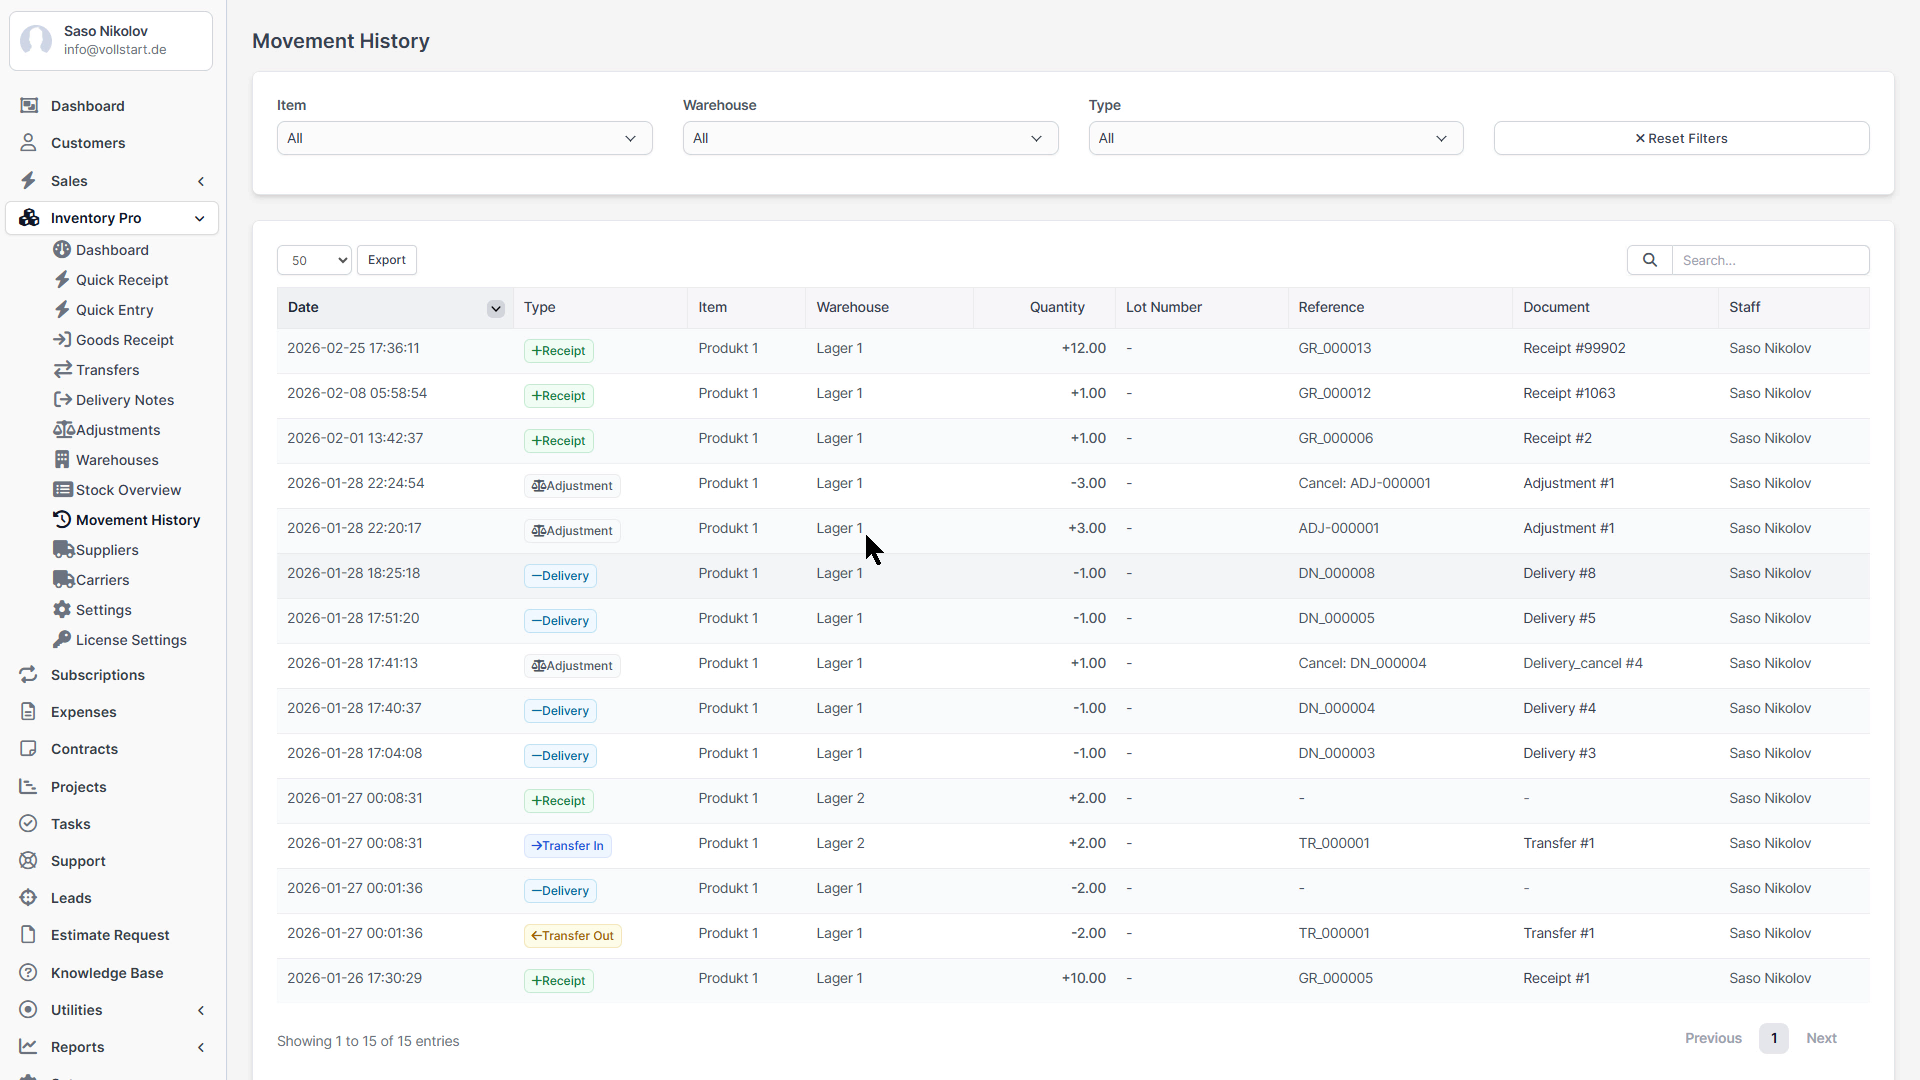
Every stock change is recorded as a movement, creating a complete audit trail. Access via Inventory → Movement History.
| Type | Trigger |
|---|---|
| Receipt | Goods receipt confirmed |
| Delivery | Delivery note confirmed |
| Transfer Out | Transfer sent from source warehouse |
| Transfer In | Transfer received at destination warehouse |
| Adjustment In | Positive stock adjustment |
| Adjustment Out | Negative stock adjustment |
| Production In | Manufacturing output (if Manufacturing Pro active) |
| Production Out | Manufacturing consumption (if Manufacturing Pro active) |
The oldest stock is consumed first. This is the standard cost flow assumption used in most businesses.
Stock with the earliest expiry date is consumed first. Ideal for perishable goods.
View the total value of your inventory per warehouse, calculated using FIFO or FEFO.
Reservations prevent overselling by holding stock for pending orders or deliveries.
Reservations can have an expiry time. If a draft delivery is not confirmed before the reservation expires, the stock becomes available again. This prevents indefinite blocking of stock.
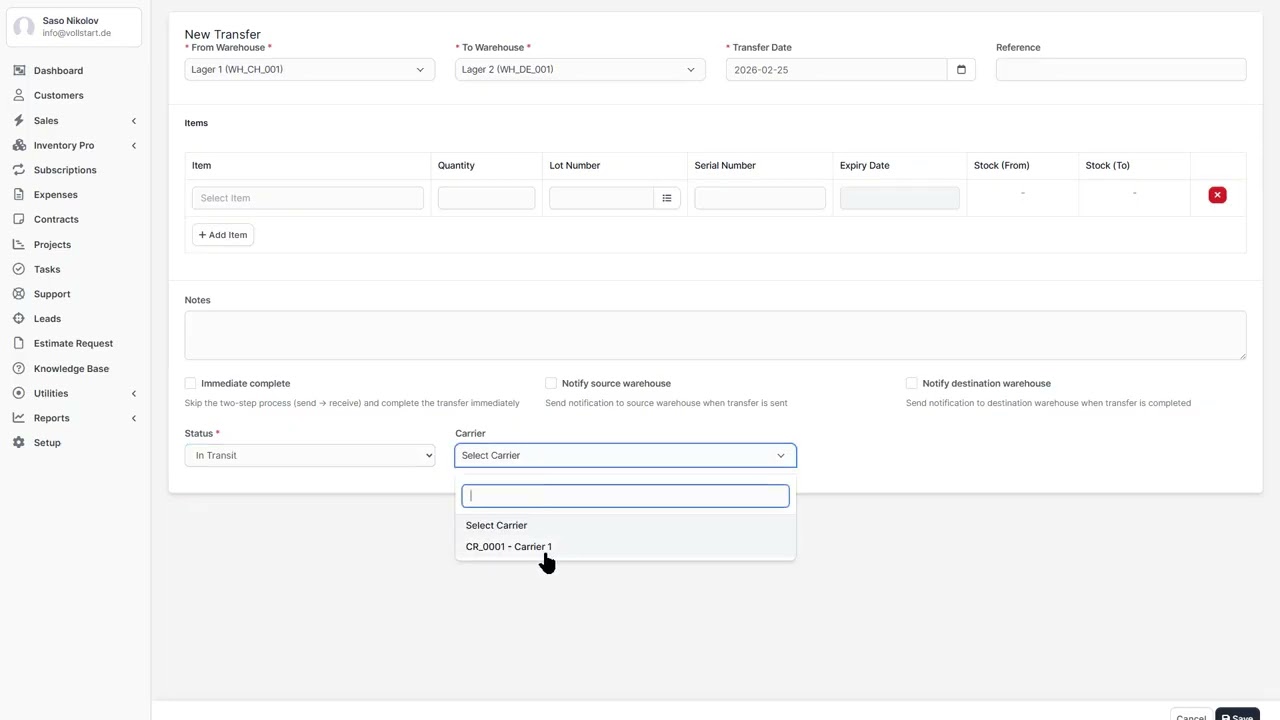
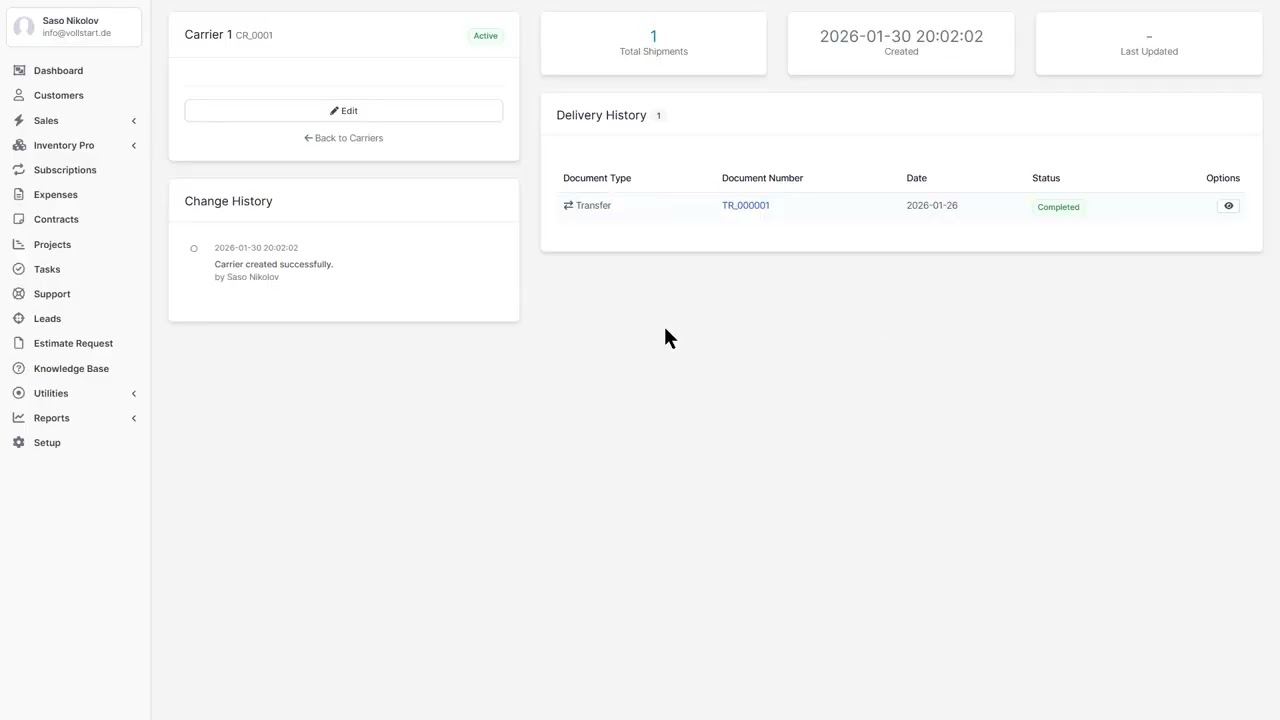
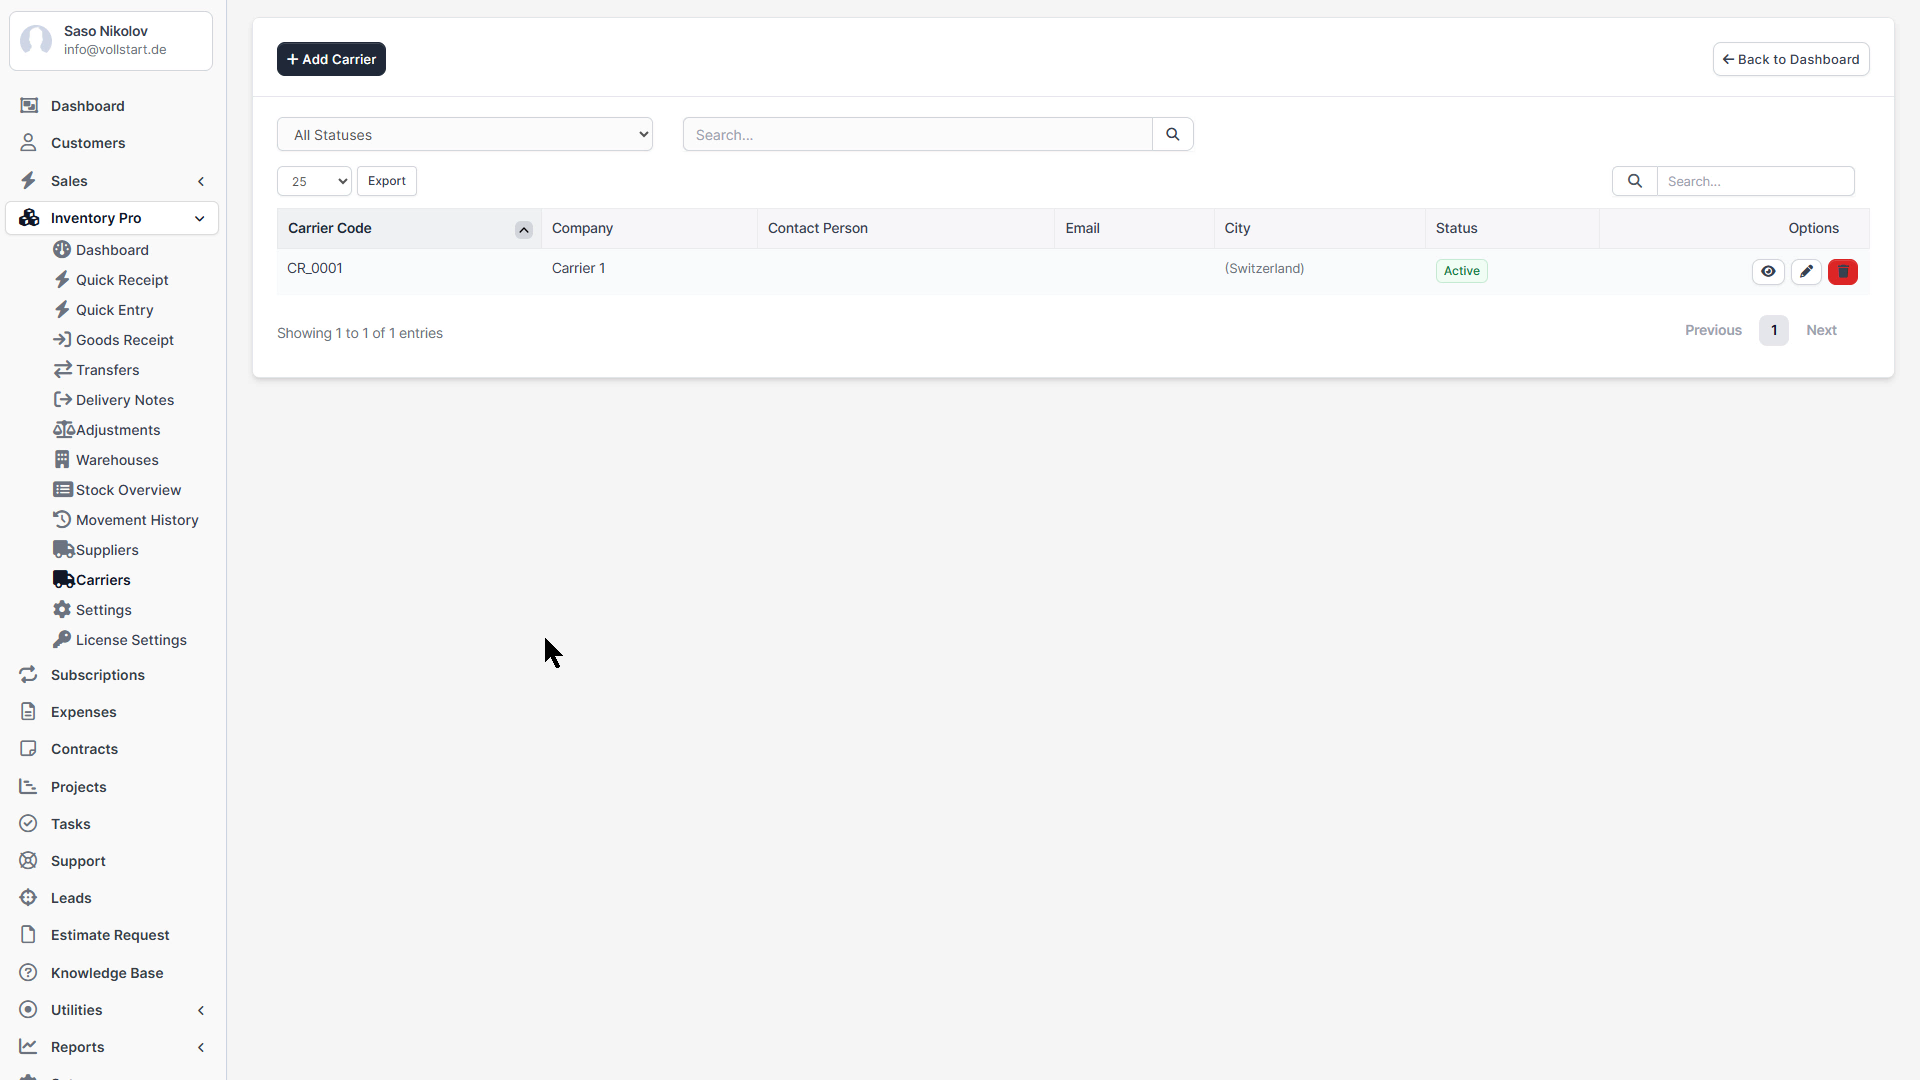
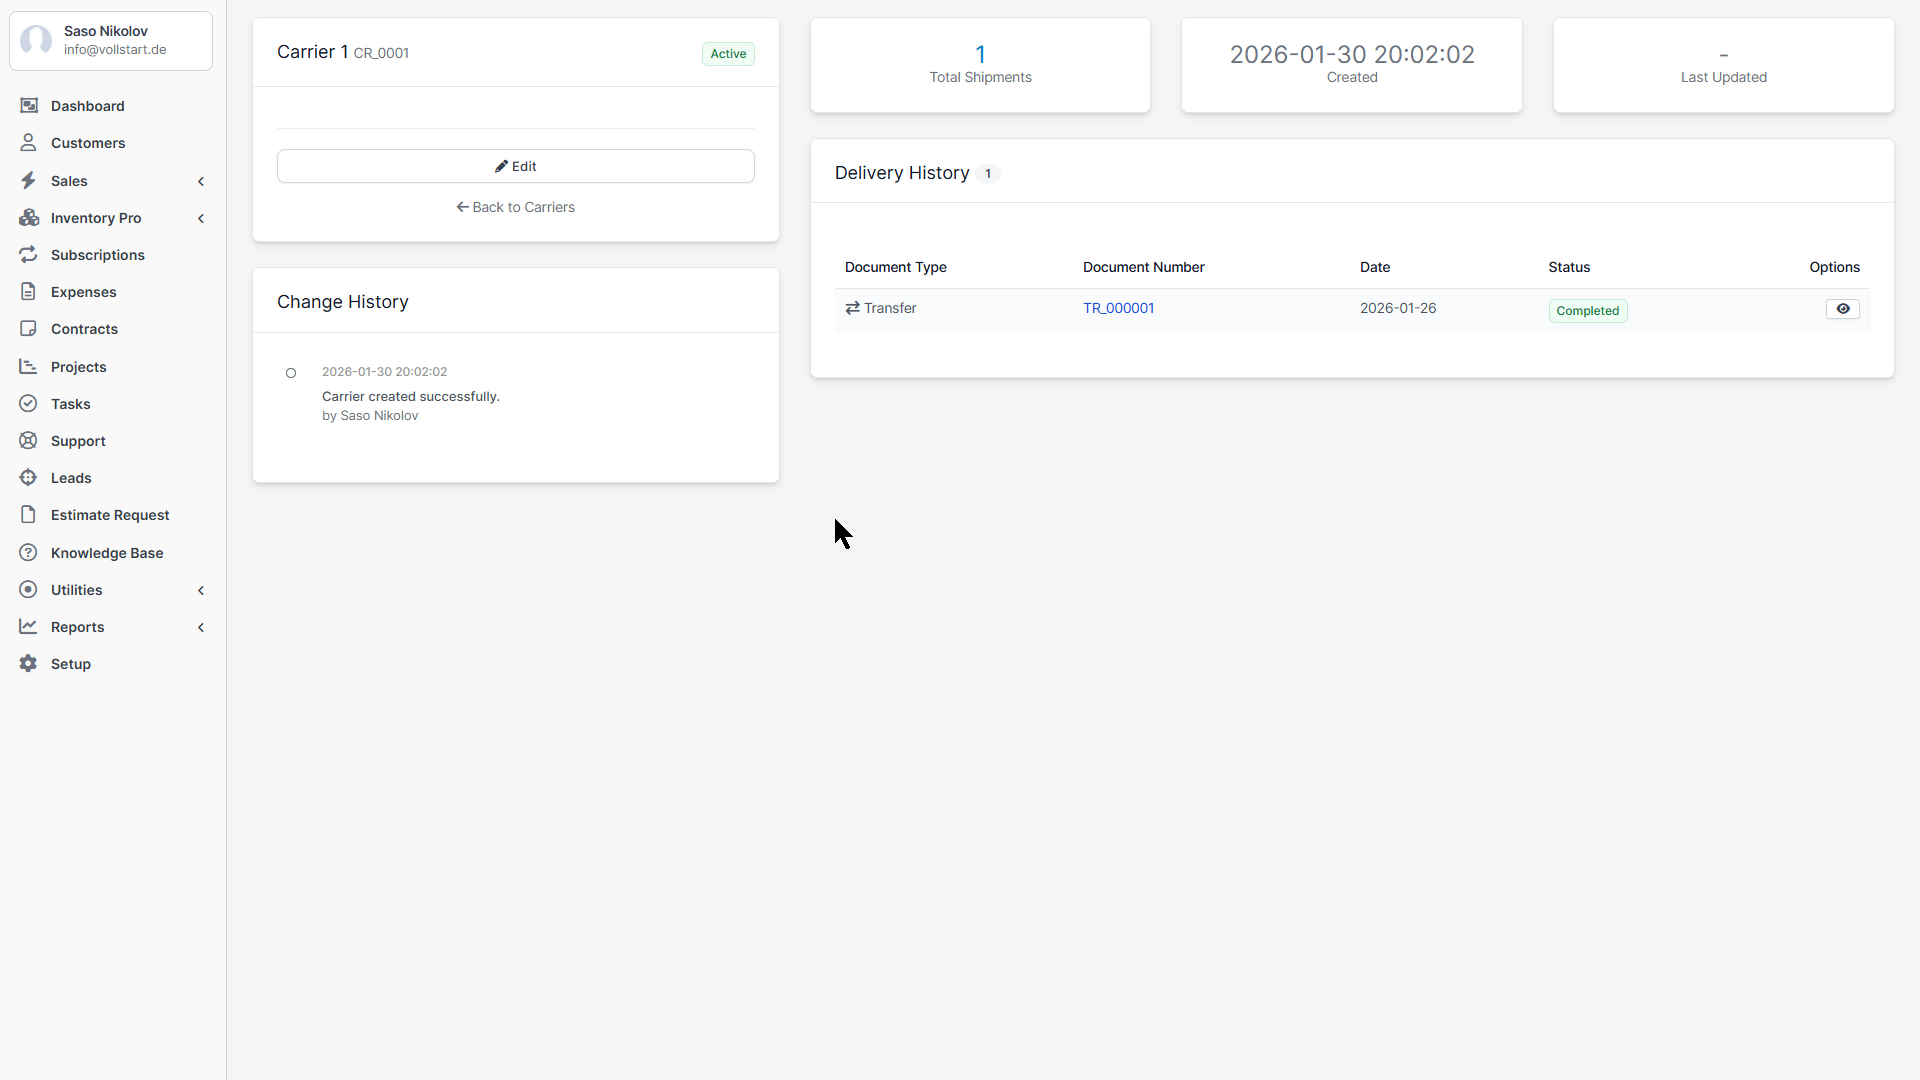
Manage your shipping carriers and freight companies. Access via Inventory → Carriers.
Attach documents to carriers that can be automatically included in delivery and transfer PDFs:
Mark a document as “Attach to PDF” to automatically merge it when generating delivery or transfer documents.
When creating a delivery note, transfer, or goods receipt, you can select a carrier from the dropdown. The carrier’s tracking number field will appear for shipment tracking.
Assign a default warehouse per client to streamline delivery note creation.
When creating a delivery note for this client, the selected warehouse will be pre-selected automatically.
Online Documentation: vollstart.com/perfex-modules/inventory-pro/doc/
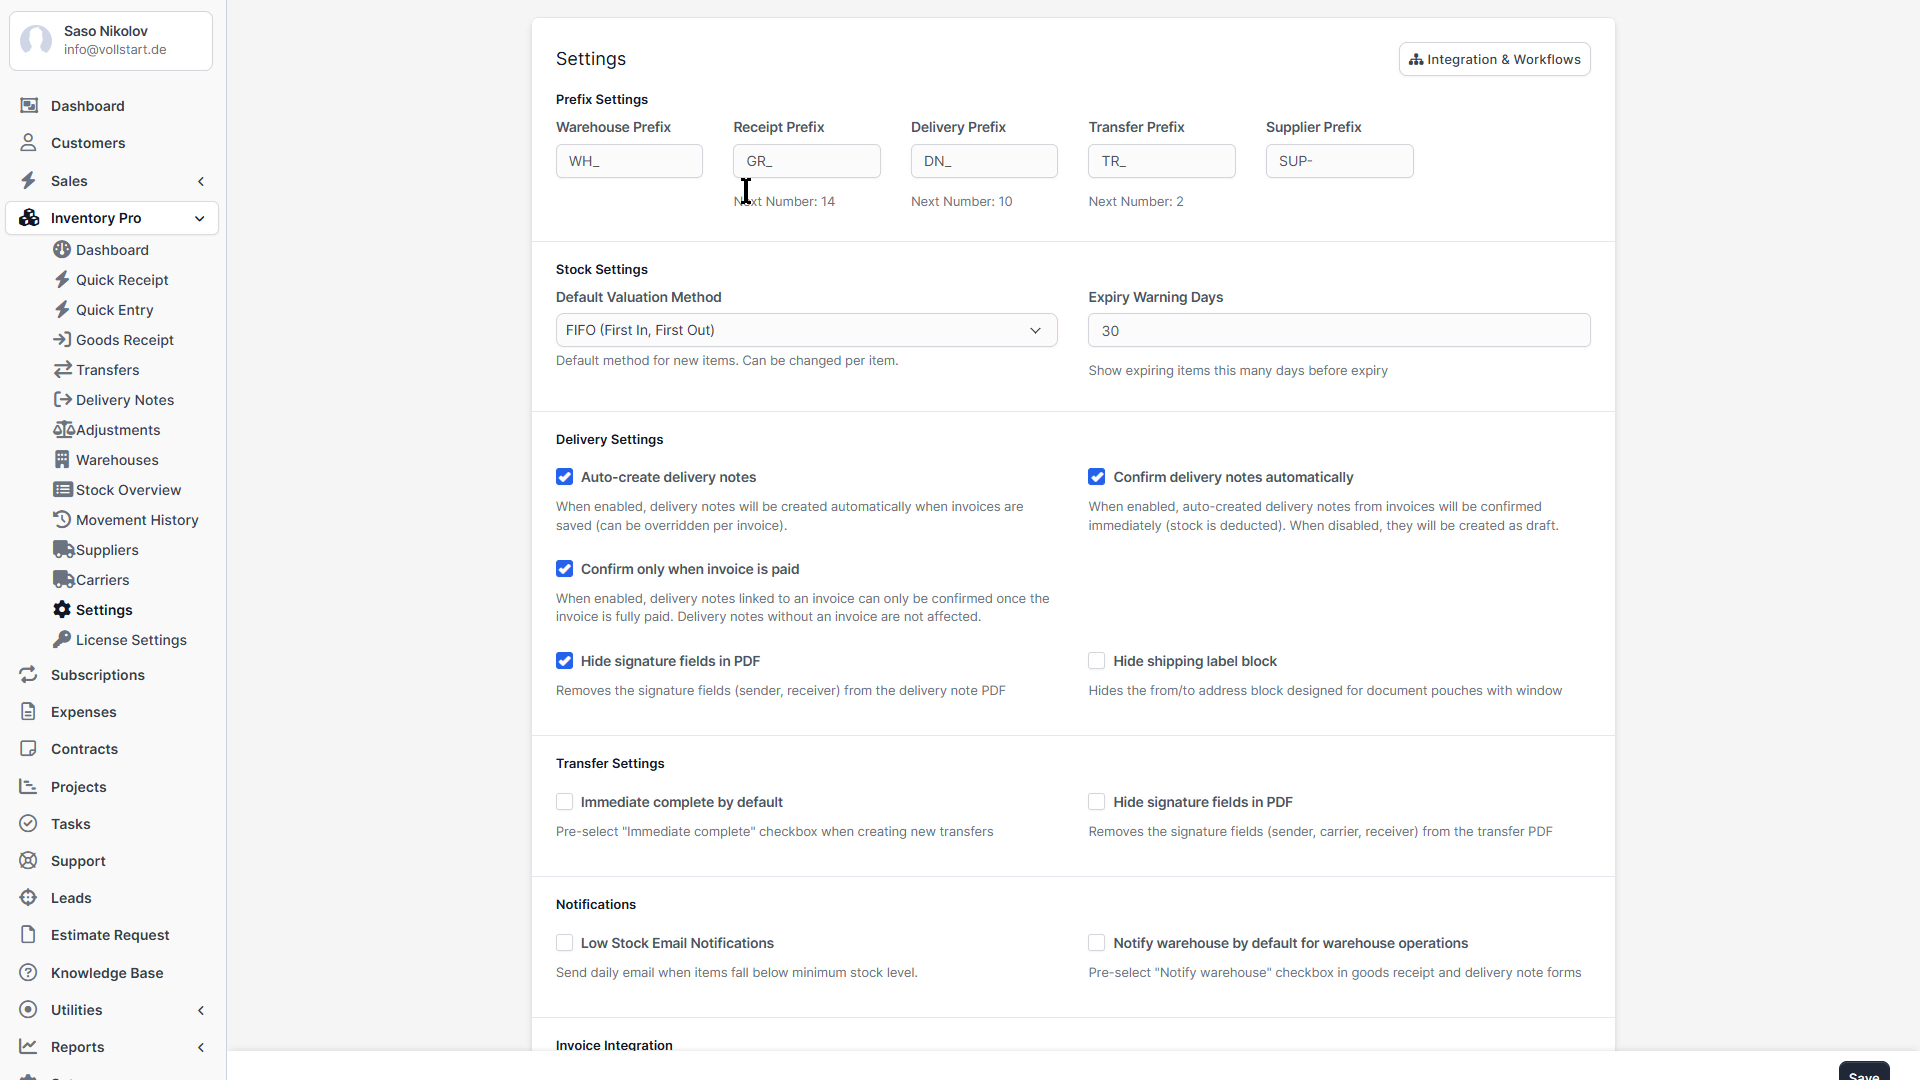
| Setting | Default | Description |
|---|---|---|
| Default Valuation Method | FIFO | FIFO or FEFO for stock valuation |
| Auto Delivery Note | OFF | Auto-create DN when invoice is generated |
| Allow Negative Stock | OFF | Allow outgoing documents when stock is zero |
| Document Number Prefix | GR-, DN-, ST-, SA-, IC- | Prefix for document numbers per type |
| Default Warehouse | (first created) | Pre-selected warehouse in forms |
| Setting | Description |
|---|---|
| Company Logo | Logo displayed on PDF documents |
| Terms & Conditions | Text printed on documents |
| Footer Text | Custom footer for PDFs |
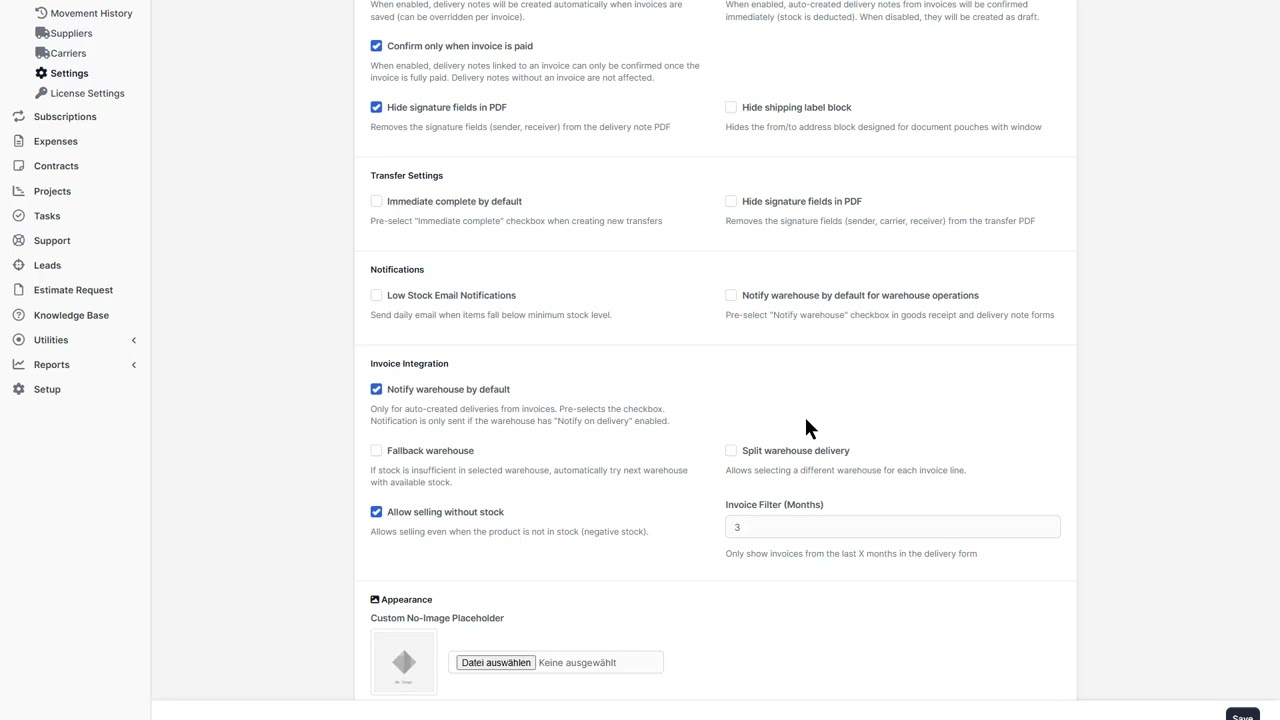
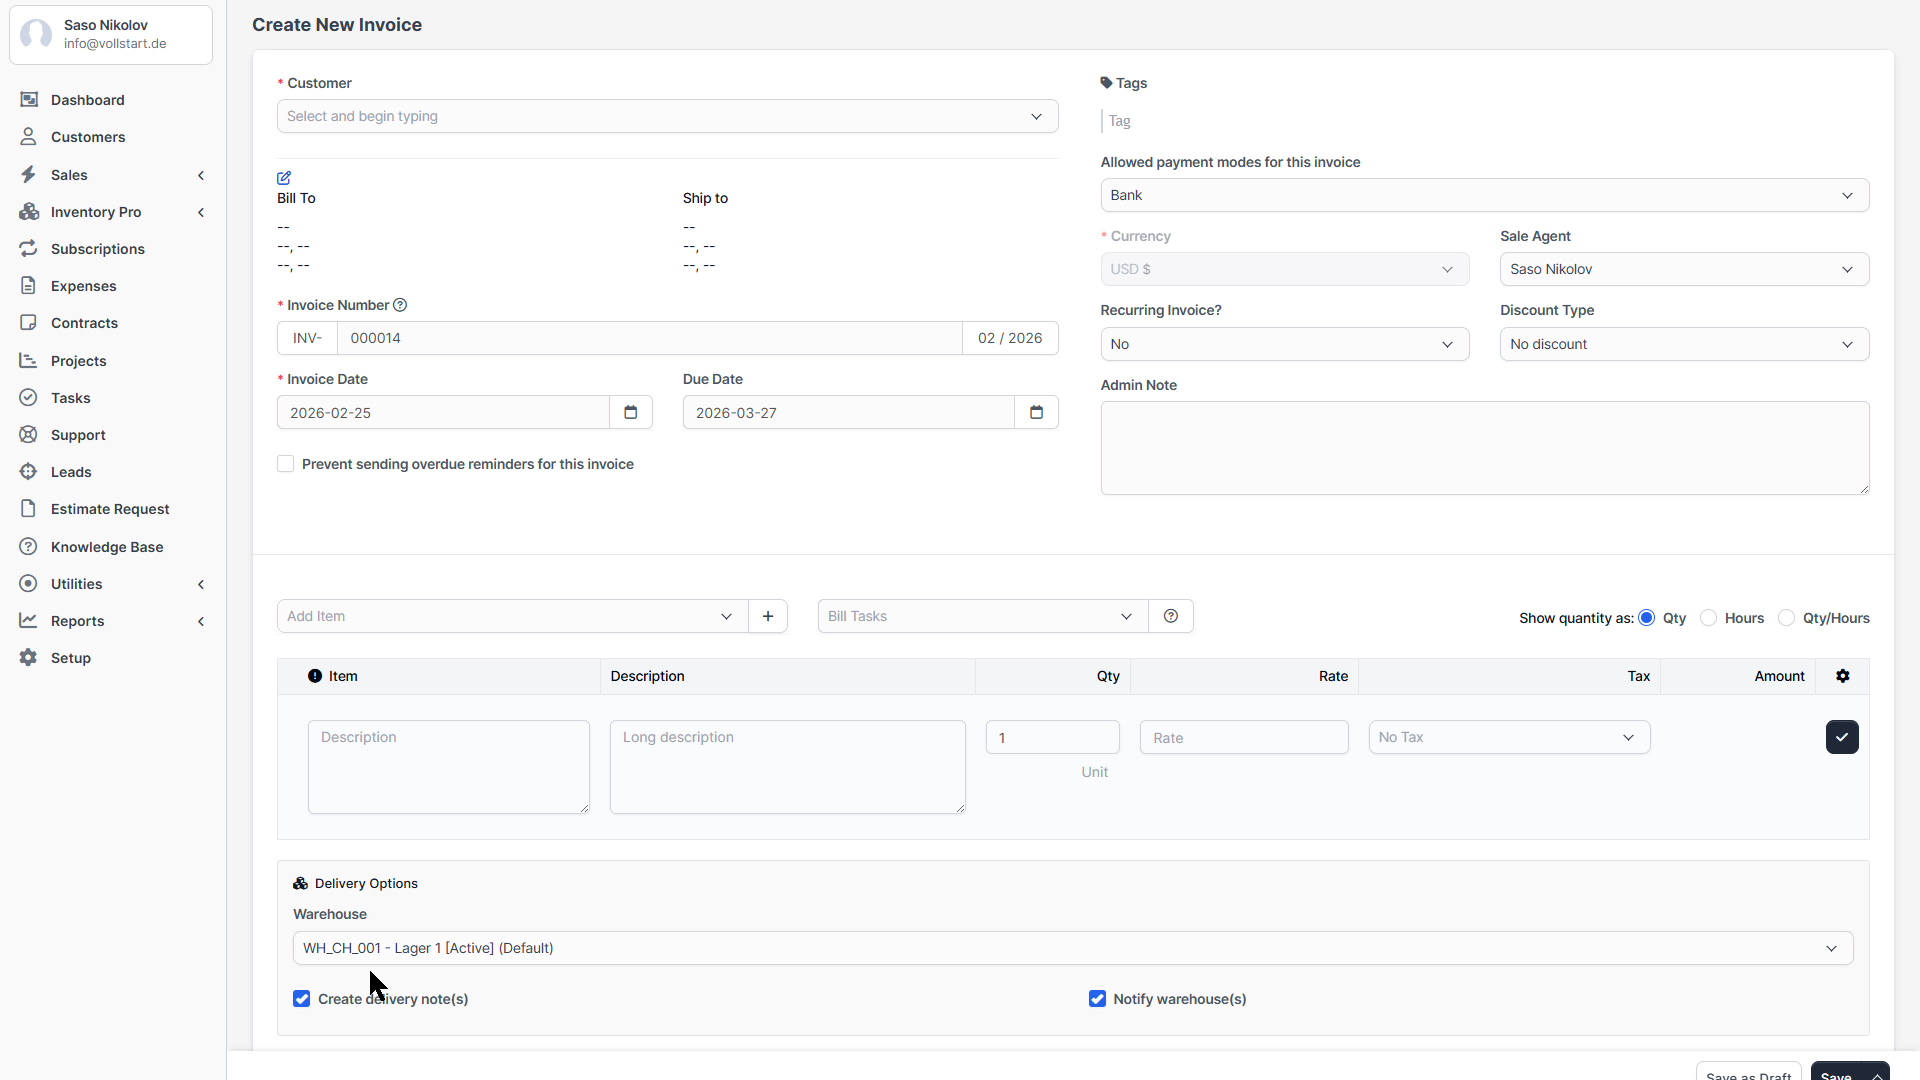
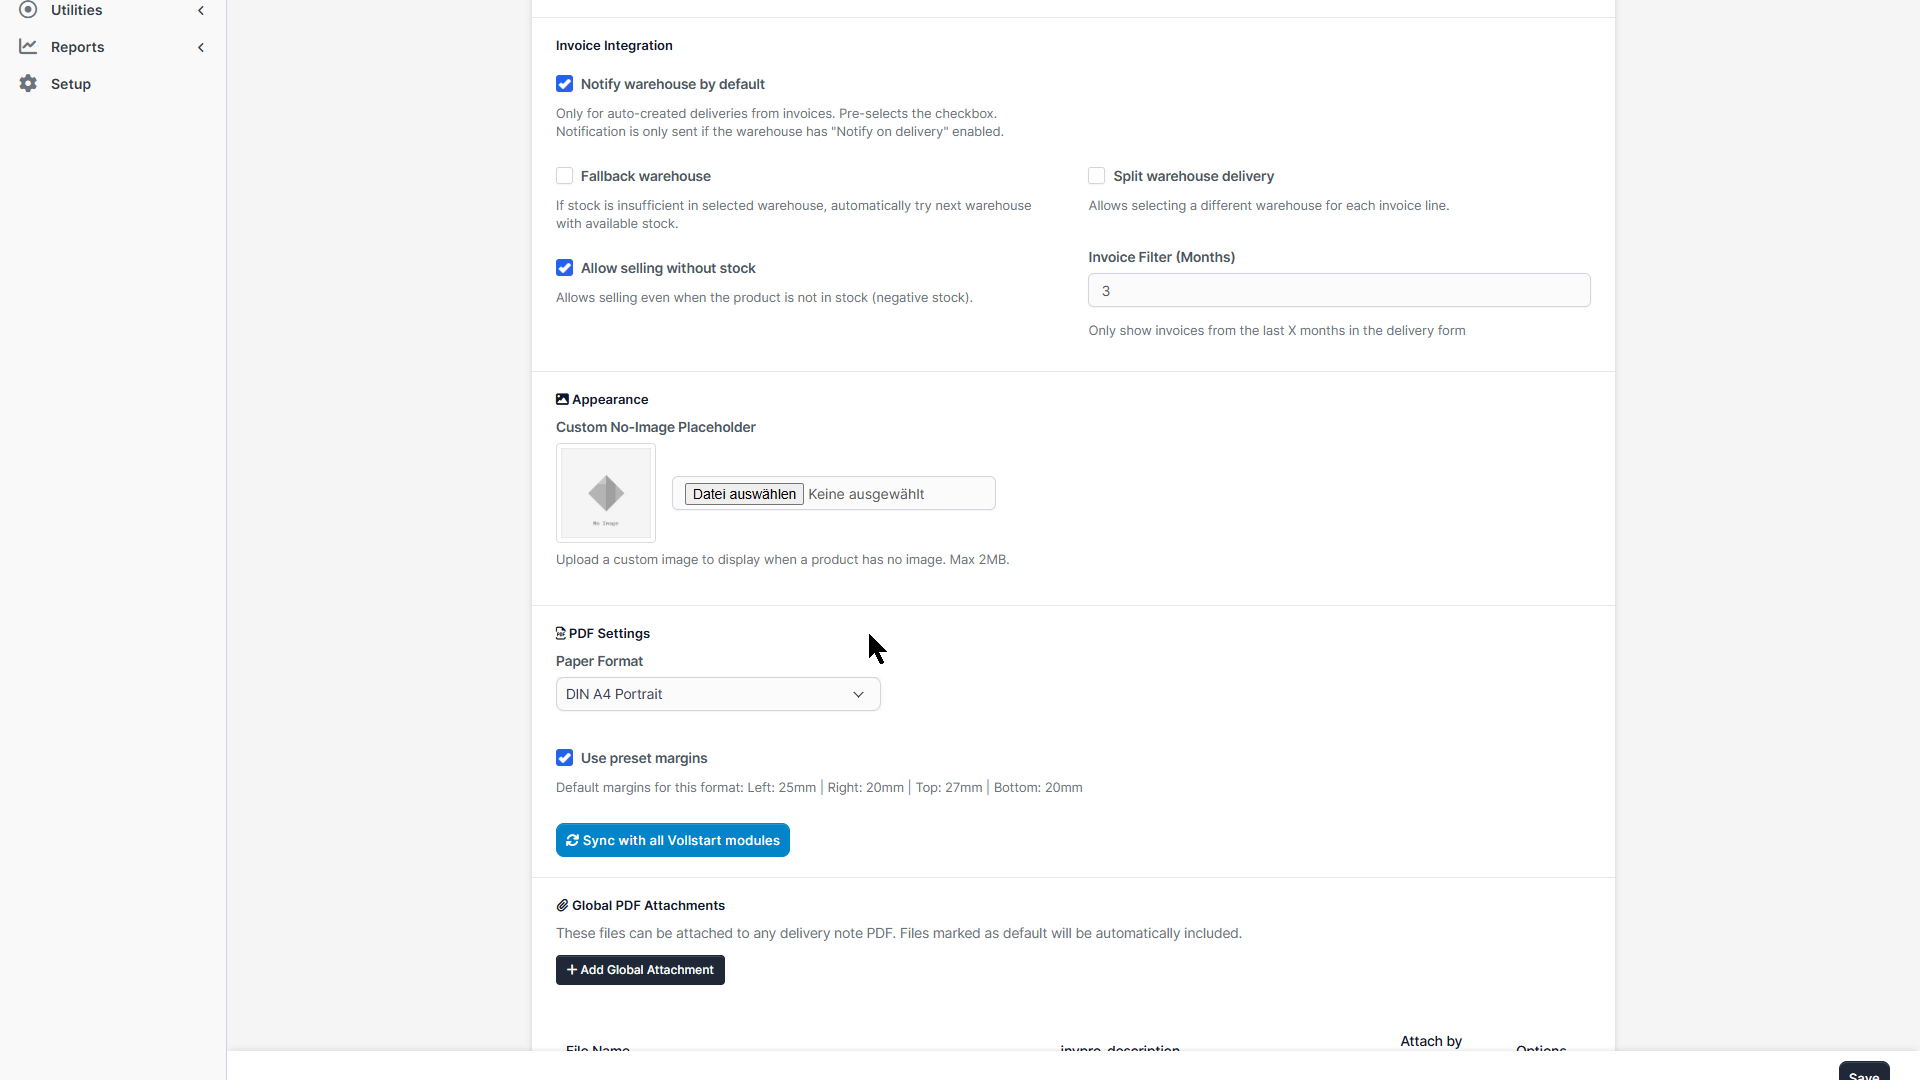
Inventory Pro integrates deeply with Perfex CRM invoices to automatically create delivery notes when invoices are generated.
On the invoice form, each line item shows a warehouse selector. This allows you to fulfill different items from different warehouses in a single invoice.
When an invoice is cancelled, related delivery notes are automatically cancelled and stock is reversed.
Inventory Pro sends three types of email notifications, all configurable via Setup → Email Templates → Inventory Pro.
| Setting | Location | Default |
|---|---|---|
| Enable Low Stock Alerts | Settings → Notifications | On |
| Notification Hour | Settings → Notifications | 9:00 |
| Default Recipient | Settings → Notifications | Admin email |
| Expiry Warning Days | Settings → General | 30 days |
Available in all templates:
{invpro_delivery_number}, {invpro_receipt_number} – Document number{invpro_warehouse_name}, {invpro_warehouse_code} – Warehouse info{invpro_delivery_items}, {invpro_receipt_items} – HTML item table{invpro_customer_name}, {invpro_supplier_company} – Contact info{invpro_low_stock_items}, {invpro_low_stock_count} – Low stock dataConfigure the format and appearance of PDF documents generated by Inventory Pro.
| Preset | Dimensions | Margins (L/R/T/B) |
|---|---|---|
| A4 Portrait | 210 × 297 mm | 25 / 20 / 27 / 20 mm |
| A4 Landscape | 297 × 210 mm | 25 / 20 / 27 / 20 mm |
| US Letter Portrait | 216 × 279 mm | 25 / 20 / 27 / 20 mm |
| US Letter Landscape | 279 × 216 mm | 25 / 20 / 27 / 20 mm |
| Custom | User-defined | User-defined |
Delivery note PDFs can automatically merge attached documents:
Delivery notes and transfers can include signature fields at the bottom of the PDF (configurable in Settings). Options:
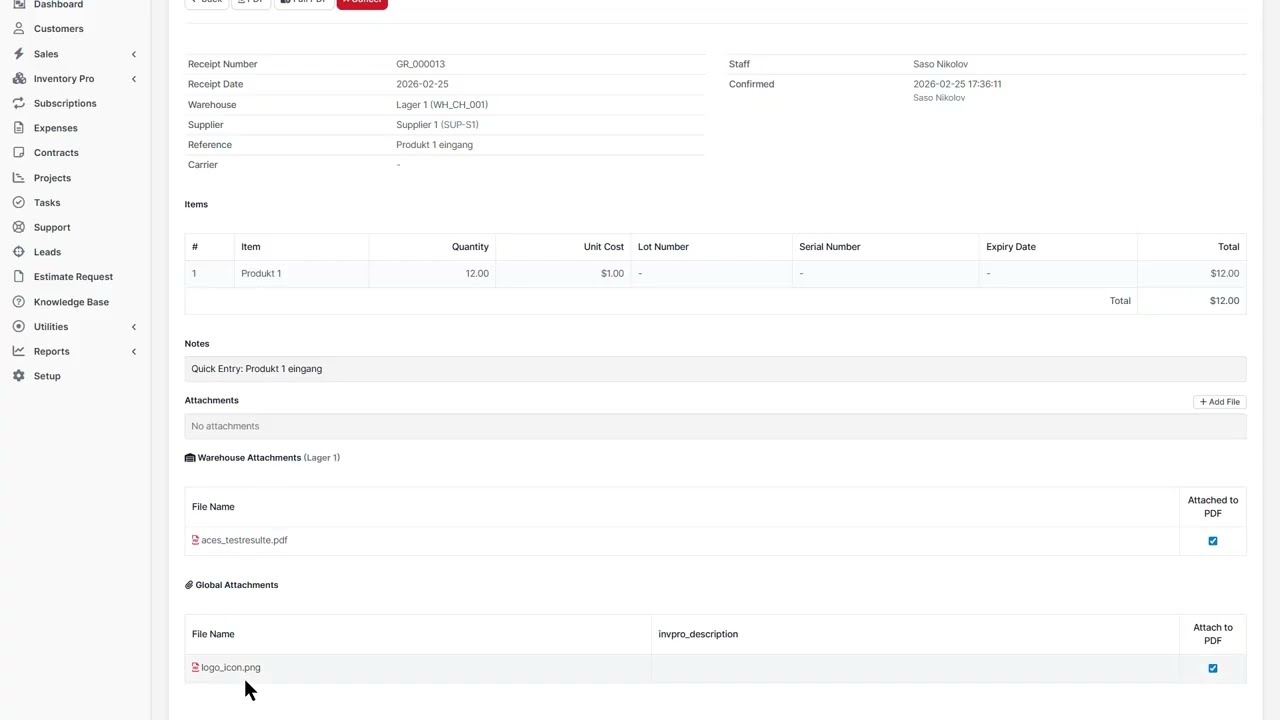
Global attachments are reusable documents that can be automatically included with specific document types.
Global attachments can be configured per document type:
| Option | Description |
|---|---|
| Default | Automatically included when creating a new document of this type |
| Attach to PDF | Merged into the generated PDF document |
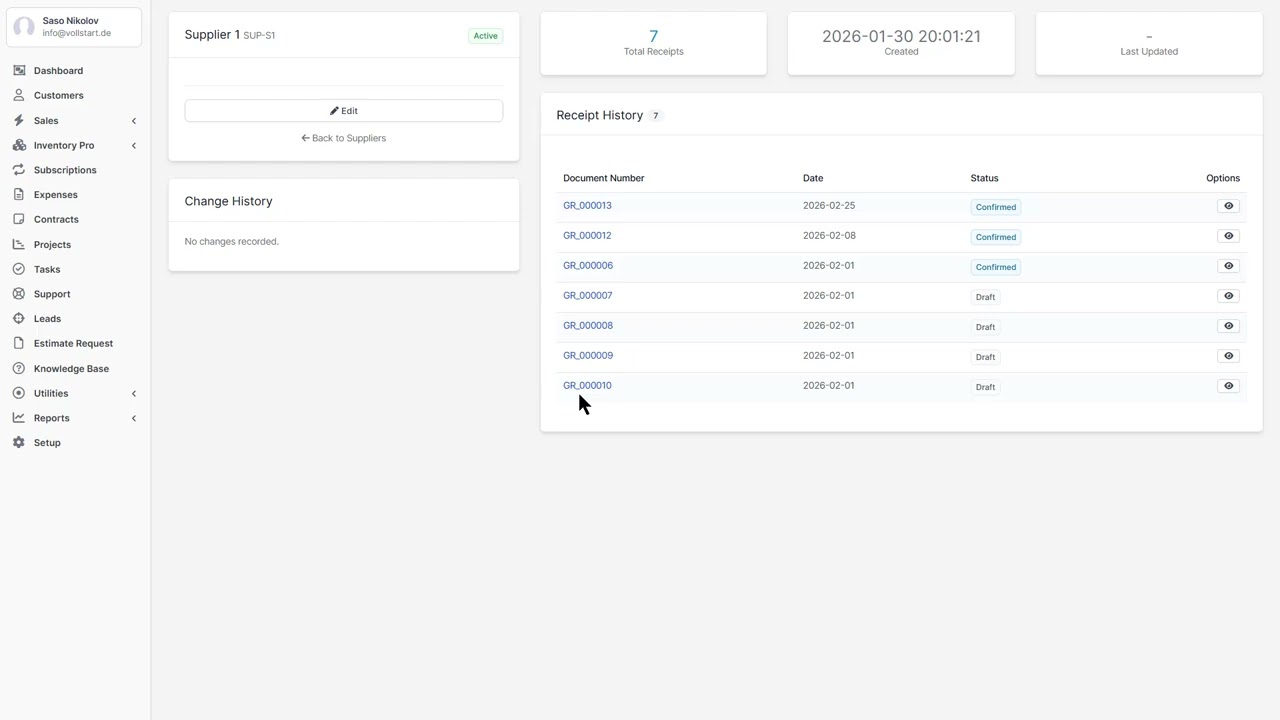
When using Purchase Pro, you can assign a default warehouse to each supplier. This means goods receipts from that supplier automatically pre-select the correct warehouse.
Inventory Pro uses the Perfex CRM permission system. Assign permissions per staff role:
| Permission | Description |
|---|---|
| View Inventory | View warehouses, items, documents, and reports |
| Create Inventory | Create new warehouses, items, and documents |
| Edit Inventory | Edit existing warehouses, items, and documents |
| Delete Inventory | Delete warehouses, items, and documents |
Navigate to Setup → Roles to configure permissions.
uploads/ directory is writable by the web serverIf you need help or have questions contact us via support email.